Posts Tagged ‘ e3d-v6 volcano

Building the C-Bot 3d Printer : Part 32 : New Cooling Fan shroud, and bulldog clips

Jump to C-Bot blog index to see all the posts.


New Cooling Fan Shroud:

Running PLA out of a volcano nozzle means you need a lot of cooling.  I’ve tried a number of solutions in the past, all of which were mainly just “point a really big fan at the hotend”.  I don’t think this is the best technique (although better than nothing) :  You want airflow directed at the filament immediately after it is extruded.

So I buckled down and designed a new cooling fan shroud in Autodesk Maya, specifically designed for the C-Bot, and the E3d-V6 Volcano nozzle I have attached to it.  You can download this file for print from Thingiverse here.  The most recent update allows you to adjust its mount location, hopefully allowing it to work with a greater variety of extruders on the C-Bot:

epfs_B03

Screenshot from Maya of B03

Here’s the previous version (B02) on my C-Bot:

cbot_filament_cooler

Low Profile Bulldog Clips

After installing the new shroud, it sits so close to the build platform, that it hits the side and rear bulldog clips I am using to secure the glass plate.  I looked all over the web for any sort of ‘low profile’ versions of these clips, but couldn’t find anything.

After a bit of thinking, I realized I could modify my existing clips instead:  Presuming you have two pairs of needle-nose pliers, a hammer, and a vice, you can do this too:

low_profile_bulldog New in front, old in back.

  • To get the clips out, jam one needle-nose into the hole of the clip, slightly opening it.  Use the other one to pull out each of the tabs.
  • Put the tabs together in a vice (with the lips of the tab in the vice), and pound it with the hammer over until they’re both 45 deg or more.
  • Slide one tab back into the clip.  Holding the clip with a needle-nose, work the other one in.  That’s it.

Next up, install on your removable bed.


Jump to C-Bot blog index to see all the posts.

C-Bot 3D Printer: Supercharging the Volcano

Jump to C-Bot blog index to see all the posts.


When I installed the 1.2mm E3D-v6 Volcano nozzle, I noticed that when my PLA cooling fan kicked on, the hotend would have a really hard time maintaining temp running at a ‘high’ (45mm/sec) extrusion speed (for the Volcano):  If starting at 220 deg, when the fan would kick on it would just drop and drop, and I’d stop the print or kill the fan when it hit 200 deg.  If I dropped the speed down to say, 10mm/sec, it could keep up.  This made me think fan+cold filament was too much for the hotend.

After much discussion on Google+ (here, and here), I tried a variety of things, none that got it working 100%.  I re did the Marlin auto-PID with the fan on full blast:  This got it to the point the temp would drop some 10-15 deg, then slowly creep back up.  But this is far from optimal.

The thing that tipped me off was the suggestion to figure out what the power is of the heater-cartridge in my Volcano hot-end:  Measuring the resistance gave me 7.1 ohm, which equal to 20.3w (voltage^2 / resistance = 12v*12v/7.1 = 20.3w).  Checking online, I noticed that there are 40w heater cartridges as well, so I picked one up (I got that one simply because it could be shipped via Amazon Prime…).  Installation ensued:

volcanoUpgrade

And that my friends, is the secret sauce:  After I got the new heater cartridge installed, I re-ran the PID-Autotune in Marlin (via Simplify3D)…

M303 E0 S200 C8

…waited a number of minutes for it to finish, then crammed the three values back into my Configuration.h, uploaded that via the Arduino IDE to the Rumba, and I was in business:  Not only does the hotend heat up faster now (220 deg in 1min 50 sec with full fan compared to 2 min 30 sec with no fan), but I can maintain hotend temp with 100% 24cfm fan kicked on.  It’ll drop maybe 3 deg when the fan blasts on, then pull right back up to temp.

So a note to any of you Volcano users:  Make sure you have the 40w heater cartridge (the one with the red leads) not the 25w one (blue leads).

I measured the new heater before I put it in:  4.1 ohm resistance, which equals 35w, not 40w.  But it works, so I’m happy :)

Another thing learned:  When you issue a M105, and get something like this back:

RECEIVED: ok T:206.1 /220.0 B:26.0 /0.0 T0:206.1 /220.0 @:127 B@:0

The @:127 is the ‘power’ going to the hotend.  Note that 100% = 127, not 255, in this instance.


Jump to C-Bot blog index to see all the posts.

“I am (calibration) Groot”

After recently switching my C-Bot 3d Printer from Bowden to direct drive, I thought I’d give the 1.2mm E3D-v6 Volcano nozzle a shot:  Previously I’d used the 1mm nozzle, but the stringing and blobbing caused by the Bowden made me swap it out for the .6mm nozzle, which I had ok success with the Bowden, and fantastic success with the direct drive.

Rather than print out boring calibration cubes (which I did start with), I thought I’d throw something a bit more complex at the nozzle, and I choose this awesome Groot sculpt from Thingiverse.

calibration_groot

Print Stats:

  • Sliced in Simplify 3D, printed via Octoprint.
  • 1.2mm E3d-V6 Volcano nozzle
  • 600 micron layer heights
  • 30mm/sec
  • 210 deg extruded blue Gizmo Dorks PLA
  • 1 shell, 30% “fast hexagonal” infill.
  • 1hr 20 min

Things noted:

  • Really happy with the intentional “low res” print quality.
  • Towards the top of the head, even my super-powerful fan running at full blast wouldn’t cool the giant globs of plastic enough to prevent stringing:  Just so much hot plastic extruding out of there.


Building the C-Bot 3D printer: Part 28 : Lighting, Ringing, Breaking

Jump to C-Bot blog index to see all the posts.


This update is a combo post on several subjects at once:

Adding Lighting

Up until now, the C-Bot has been a dark printer:  No internal lighting whatsoever.  My Replicator1 is like a little supernova next to it when the room is dark.  But no longer:  Over the weekend I added both an 12v LED strip to the top-front X-beam (pointing directly at the print-bed) and a superbright LED directly on the print-head itself:

While my buddy Mason did a slick job of wiring his LED strip directly into the Rumba board on his C-Bot, so he can adjust the lighting based on the print settings, I did not:  I ran a extra 12v lead out of my power-supply, and connected both the LED Strip, and the superbright LED (with inline resistor) directly to it:  Turn C-Bot on, lights turn on.  Nuff’said / good enough.

Breaking

After I installed the lighting and turned the bot back on, the Bowden extruder suddenly started jittering:  It would no longer extrude filament.

I started by swapping a DRV8825 stepper driver from the z-steppers to the extruder stepper slot:  Try extruding, and it works.  Ok, it must be a bad DRV8825, and I have no spares.  But I do have a bunch of extra A4988‘s:  I’ll just put one in there, and updated my firmware to use it instead.  It doesn’t work:  Jittering starts again.  So I revert the firmware change, and put a ‘good’ DRV8825 back in:  Jittering.  What is going on?

Soon, any DRV8825 I put in that slot causes jittering, but they all work when plugged back into their original slot.  Drivers are good,… is my board bad?  At this point I disconnect the 4-prong JST connector running from the board to the stepper, and notice that one side is slightly melted: I remove the wires from the connector, and connect them on-by-one to the pins on the board:  Everything starts working again.

Canibalizing a connector from some other wires, I reinsert the leads, plug it into the board, and back in action.

Seriously?!?

Improving Ringing / Ghosting

I had recently printed out a “Sledgehammer Games Recognition Coin Holder” for someone at work (I modeled it in Maya / Tinkercad):  We can give out cool coins to fellow employees for doing good work, and I designed this coin holder so people can show them off (there’s four slots in the top to hold the coins).

I’d printed many on my Replicator 1 in the past, and printed this one on the C-Bot for the first time.  And what I noticed was, there was a terrible amount of ghosting / ringing happening:
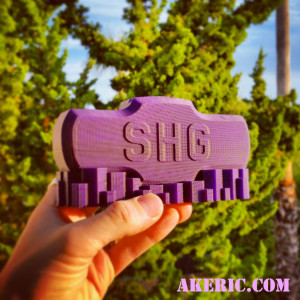
shg_recognition

Click to see the full-size that really shows the problem off.

This was printed with the .6mm E3D-Volcano nozzle, 300 micron layer heights at 60mm/sec, in MakerGeeks Royal Purple PLA.

The issue was, the prints done on my Replicator 1 had less ringing than the C-Bot, and this didn’t make sense to me:  The C-Bot has a Bowden extruder, thus removing a bunch of moving mass from the toolhead, not to mention it uses Core-XY mechanics, that is supposed to help out as well.  Why are things worse?

Posting this question to the 3D Printing Google Group, I got a bunch of good answers.  Specifically, my firmware acceleration may be too high, and the size of the printer itself could be causing too much shake, do to the lack of additional cross-members for stability.  Right now I have no surplus extrusions to stiffen it up, and my ultimate goal is to bolt the printer directly to the wall, thus really locking down any shaking.  But in the meantime, I can adjust the acceleration in the firmware.

I made a ringing/ghosting test model in Maya that would show off the issue on X, Y, and XY all at the same time.  I printed it with my default settings (3000 mm/sec), then dropped it waaay down to 800 mm/sec.  The results were pretty obvious:

ringing_comparison

Click for bigger pic

On the left of each image, is the ‘800 mm/sec acceleration’ print, and on the right is the ‘3000 mm/sec acceleration’ print.  These changes were made in Marlin’s Configuration.h:

#define DEFAULT_ACCELERATION 800
#define DEFAULT_RETRACT_ACCELERATION 800
#define DEFAULT_TRAVEL_ACCELERATION 800

I just set everything that looked applicable to 800.

So, an noticeable improvement.  But once I get the printer “bolted down”, I hope to be able to print even faster, with better results.


Jump to C-Bot blog index to see all the posts.
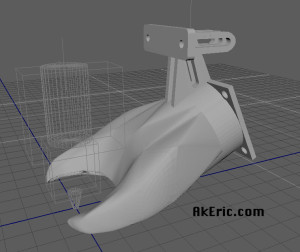
Visual comparison of 1mm 3d printer nozzle overhang tolerance

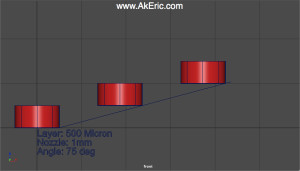
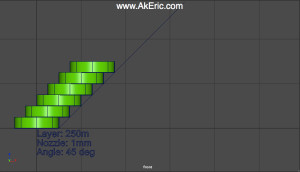
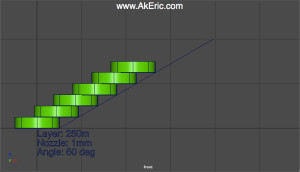
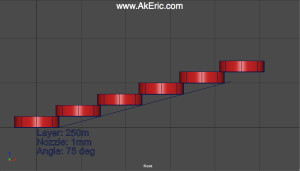
Since I’ve been printing with a 1mm E3D-v6 Volcano nozzle on my C-Bot, overhang has become more of an issue than on my Replicator 1: The thicker the layers get, the less overhang you can support.  I could ‘sort of visualize this’ in my head, but I wanted to get it down on paper where it truly makes sense.

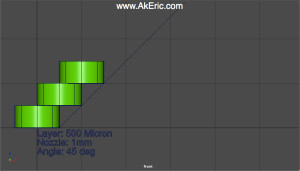
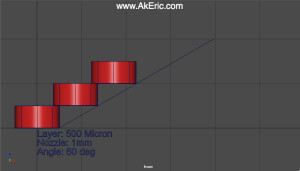
I mocked up nozzle diameter, layer thickness, and print/overhang angle in Maya, below are the results.  Very quickly you can see how the thinner your layers are, the better overall overhang you can support.  I did this presuming only one shell was being used.  Using two shells would support better overhang, since the outer layer would have the inner one to stick to.

1mm nozzle, 500 micron layer height:

lay500_nozzle1mm_angle45  Success with one or two shells.

lay500_nozzle1mm_angle60Fail with one shell, possible success with two shells.

lay500_nozzle1mm_angle75  Fail with one or two shells.

1mm nozzle, 250 micron layer height:

lay250_nozzle1mm_angle45 Success with one or two shells.

lay250_nozzle1mm_angle60 Success with one or two shells.

lay250_nozzle1mm_angle75 Fail with one shell, possible success with two shells.