Posts Tagged ‘ 3d printer

Building the C-Bot 3d Printer : Part 37 : 2017 Redux

Jump to C-Bot blog index to see all the posts.


Hard for me to believe I built the C-Bot just over two years ago.  During that time I’ve done a number of upgrades, but a weird z-wobble had shown up in the process, that I’d been completely unable to resolve.

After discussion on the C-Bot/D-Bot 3D Printer Google Group, I generated a new list of parts to re-3d print, to improve my bot.  So I really can’t call this a C-bot anymore, it’s more of a C-Bot/D-Bot/Spiffbot (+ others) mashup at this point.

So after two weekends of disassembly & reassembly, the CDSO-bot is back up and running.  Behold:

cbot_redux_web

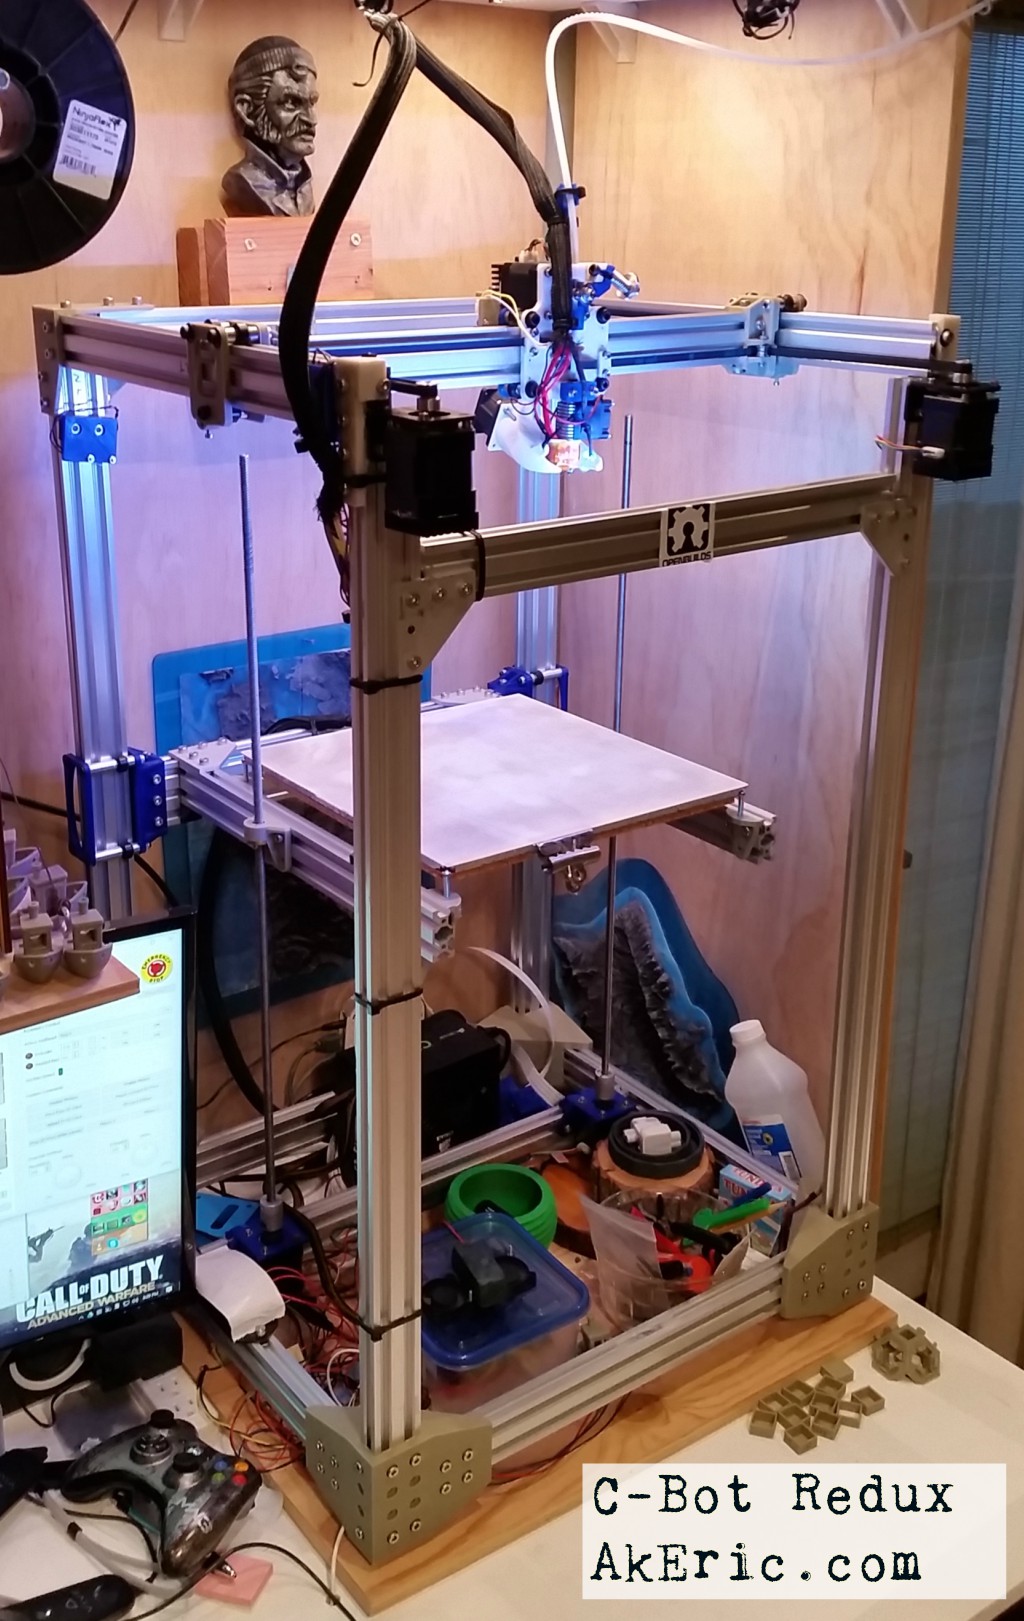
The colors are a bit like a time machine:  Anything in blue is original prints. White was printed next, and latest is gray.

Overview of my updates below.  Huge thanks to all of those who have put time in to improve these files, and release them for free!

  • Printed all new lower corner brackets based on the Spiffbot designs.  These add the bulk of the rigidity to the new system.  Feels like a tank now.
  • I remixed the D-bot top XY-idlers, extending them down on Z an extra 20mm, to provide for even more z-rigidity.
  • Switched my X-endstop to now be on the X-carriage instead of the Y-gantry.  Used the ‘X-endstop mount for the direct-drive gantry’, by pizzachef.  This cleaned up a bunch of wiring from the left side.  While it added more mass to the toolhead, it seems pretty negligible.
  • From the D-Bot remix by spauda01, leadscrew brackets and bed supports:
  • All new smaller, 3-wheel brackets for my Y Gantry, by BucketOchicken.  These are nice in providing slightly more space on +/- Y.
  • Used some silicon caulk to affix a 12″ square chunk of cork under the heated bed.  Hopefully will heat up faster, and save some energy.
  • Switched from the front/back leadscrew design to the “middle, side-by-side design” (+ brass nuts), just to try something new, since I had the spare extrusion.  The extrusion is held in place by triangular aluminum brackets, making the base even more rigid.
  • The top front X-beam is now held in place my much stronger aluminum triangle-brackets.

Here’s another pic of some of the updated parts I printed, mocked up to make a very tiny printer 😉

smallxy_akeric

Successes:

  • Once I rebuilt everything, and got all the electronics re-hooked-up, everything still worked!  No magic smoke, nothing exploding.
  • The dumb z-wobble I was experiencing is gone!
    • Update:  Wait, no it’s not.  ARGH!

Issues:

  • With the new L/R leadscrew config, they now hit both my “beefy print cooler fan” (on the left), and my inductive probe (on the right) if printing all the way to the edge of the volume: I’ll need to remove them, and cut about an 1″ off to solve that problem.
  • I ran out of T-nuts:  I had a surplus during my last build, but this one used up all the remaining ones, and then some.  So waiting for that delivery slowed things down a bit.
  • Even with the giant new base-corners, it still wasn’t square on top:  While the based seemed to be nice and square, it took some time to get all the top extrusions back in line.

Overall, a very successful rebuild.  Here’s to another two years of 3d printing!


Jump to C-Bot blog index to see all the posts.

C-Bot 3D Printer: Supercharging the Volcano

Jump to C-Bot blog index to see all the posts.


When I installed the 1.2mm E3D-v6 Volcano nozzle, I noticed that when my PLA cooling fan kicked on, the hotend would have a really hard time maintaining temp running at a ‘high’ (45mm/sec) extrusion speed (for the Volcano):  If starting at 220 deg, when the fan would kick on it would just drop and drop, and I’d stop the print or kill the fan when it hit 200 deg.  If I dropped the speed down to say, 10mm/sec, it could keep up.  This made me think fan+cold filament was too much for the hotend.

After much discussion on Google+ (here, and here), I tried a variety of things, none that got it working 100%.  I re did the Marlin auto-PID with the fan on full blast:  This got it to the point the temp would drop some 10-15 deg, then slowly creep back up.  But this is far from optimal.

The thing that tipped me off was the suggestion to figure out what the power is of the heater-cartridge in my Volcano hot-end:  Measuring the resistance gave me 7.1 ohm, which equal to 20.3w (voltage^2 / resistance = 12v*12v/7.1 = 20.3w).  Checking online, I noticed that there are 40w heater cartridges as well, so I picked one up (I got that one simply because it could be shipped via Amazon Prime…).  Installation ensued:

volcanoUpgrade

And that my friends, is the secret sauce:  After I got the new heater cartridge installed, I re-ran the PID-Autotune in Marlin (via Simplify3D)…

M303 E0 S200 C8

…waited a number of minutes for it to finish, then crammed the three values back into my Configuration.h, uploaded that via the Arduino IDE to the Rumba, and I was in business:  Not only does the hotend heat up faster now (220 deg in 1min 50 sec with full fan compared to 2 min 30 sec with no fan), but I can maintain hotend temp with 100% 24cfm fan kicked on.  It’ll drop maybe 3 deg when the fan blasts on, then pull right back up to temp.

So a note to any of you Volcano users:  Make sure you have the 40w heater cartridge (the one with the red leads) not the 25w one (blue leads).

I measured the new heater before I put it in:  4.1 ohm resistance, which equals 35w, not 40w.  But it works, so I’m happy :)

Another thing learned:  When you issue a M105, and get something like this back:

RECEIVED: ok T:206.1 /220.0 B:26.0 /0.0 T0:206.1 /220.0 @:127 B@:0

The @:127 is the ‘power’ going to the hotend.  Note that 100% = 127, not 255, in this instance.


Jump to C-Bot blog index to see all the posts.

Building the C-Bot 3D printer: Part 30 : Switching from Bowden to Direct Drive

Jump to C-Bot blog index to see all the posts.


The original design for the C-Bot by Carl Feniak had the printer setup with a Bowden extruder: The stepper pushing the filament to the hotend sat off to the side of the printer, thus removing mass from the XY/hotend gantry:  The idea is that if there is less moving mass, you can print faster with fewer artifacts (like “ringing” or “ghosting”).  For comparison, my Makerbot Replicator1 (or say, an Ultimaker) is ‘direct-drive’: Its extruder sits directly on the XY gantry pulling filament into the hotend.  This is what I had experience with when I started building the C-Bot, but the idea of learning something new (the Bowden setup) was interesting to me, so I went with it.

Fast-forward to now:  Not a fan of the Bowden setup, at least when used within the specs of my printer design:  I have a E3D-v6 Volcano nozzle (I’ve used .6mm & 1.0mm nozzles) on my bot, and that coupled with the Bowden design have had some quality issues I’ve been unable to overcome despite hours (days…) of test printing.  Specifically “blobs\zits” & stringing.  My guess is, simply too much pressure builds up in the (long) Bowden tube during an extrude move, so when the print goes to do a retraction, a blob still shoots out and gums-up the print, or strings out during movement.  Have not been happy with this behavior, and have been unable to remove it entirely.  Have greatly reduced it, but it’s always there… lurking…

And during this tuning process I came to the realization that a Bowden doesn’t really help things when you’re using a Volcano nozzle:  The benefit of the Bowden, again, is that it removes moving mass from the hotend, allowing you to print at faster speeds.  But with a Volcano, you actually end up printing at much lower speeds, just a greatly increased volume\flowrate.  Here’s some maths:

  • My Replicator1, with a .4mm nozzle, printing at 200 microns (‘medium res’ for that nozzle), at 120mm/sec, has a flowrate of 9.6 mm3/sec (mm cubed/sec).
  • The C-Bot, with a 1mm Volcano nozzle, printing at 500 microns (‘medium res’ for that nozzle) at 45mm/sec has a flowrate of 22.5 mm3/sec.

The C-bot printing at a little over 1/3 the speed of the Rep1, but over 2x faster print times overall (based on the flowrate).  And when you’re printing that slow, I personally don’t feel the moving mass has such a big effect.

On the flipside, if you’re building one of these bots and running a .4mm nozzle, the Bowden is probably ok:  Smaller nozzle, less pressure, less blobs & stringing.  But since I’ve never actually used one on my bot, this is only a guess.

Time goes by…

After some discussion on the Forms (starting on this page, where you can also find the files for download, and my detailed comments on its design), Carl created a new “beta” direct-drive system.  Which is just amazing of him to do, so again, many thanks Carl!  I printed them out on my rep1, spent an afternoon installing them, and what a difference!

The firs pic shows off the new direct-drive design, and a calibration print of two cylinders:  Zero stringing between them.  With the Bowden, it would look like a spider could live in there.

The 2nd print is of a 3dBenchy, with no cleanup: Almost no stringing or blobs.  Both prints used the .6mm Volcano nozzle.

For both of these, I’m using the same Simplify3D profiles as before, I just dropped the retraction from the 5ish-mm to 1mm.  So much more accurate!  Currently in the process of tuning them even more.

I also modified the rear-plate to accept the 40mm fan mount & duct as designed by trublu832 on OpenBuilds, and you can find his files here on Thingiverse:  No more dual fans, just one ducted one.

As of this post, Carl has released a new version of the parts I have yet to print, but I plan to soon.

But overall, if you plan to build one of these printers and use an Volcano nozzle, I’d highly recommend using this new hotend design.


Jump to C-Bot blog index to see all the posts.

Building the C-Bot 3D printer: Part 29 : Rearranging the Leadscrews

Jump to C-Bot blog index to see all the posts.


The C-Bot build instructions have you create a cantilevered build platform, with two rear leadscrews to drive it up and down.  Other designs have modified this to have a triple-leadscrew system where two screws are in the back, and one in the front:  This provides for better stability for the cantilevered build platform.  I’ve noticed on my larger prints a bit of “bounce/vibration” that happens on the platform as it drops over the lifetime of the print.  It would make sense that attaching the front to something would reduce this.

I seriously contemplated going to a triple-leadscrew system, but this would involve buying more hardware, cutting another leadscrew, etc.  Not the end of the world, but I’d like to work with what I already have.  I got to thinking:  Why not just take one of the rear leadscrews and put it in the front?

That’s what I did this afternoon, and so far, it’s worked out really well:  I had a long enough 20×40 cutoff I was able to put across the front of the build platform, and some spare printed corner-brackets to mount it in-place. From there, I took the right-rear leadscrew and moved it to the center.  Then I took the left-rear leadscrew and moved it to the new front location.

leadscrew_rearranged

Things noticed so far:

  • Build platform is much more rigid.
  • It’s easy to raise\lower the front\back for bed leveling by just twisting the leadscrews.

Jump to C-Bot blog index to see all the posts.

Visual comparison of 1mm 3d printer nozzle overhang tolerance

Since I’ve been printing with a 1mm E3D-v6 Volcano nozzle on my C-Bot, overhang has become more of an issue than on my Replicator 1: The thicker the layers get, the less overhang you can support.  I could ‘sort of visualize this’ in my head, but I wanted to get it down on paper where it truly makes sense.

I mocked up nozzle diameter, layer thickness, and print/overhang angle in Maya, below are the results.  Very quickly you can see how the thinner your layers are, the better overall overhang you can support.  I did this presuming only one shell was being used.  Using two shells would support better overhang, since the outer layer would have the inner one to stick to.

1mm nozzle, 500 micron layer height:

lay500_nozzle1mm_angle45  Success with one or two shells.

lay500_nozzle1mm_angle60Fail with one shell, possible success with two shells.

lay500_nozzle1mm_angle75  Fail with one or two shells.

1mm nozzle, 250 micron layer height:

lay250_nozzle1mm_angle45 Success with one or two shells.

lay250_nozzle1mm_angle60 Success with one or two shells.

lay250_nozzle1mm_angle75 Fail with one shell, possible success with two shells.