Archive for the ‘ projects ’ Category

CG model -> 3d printed -> metal cast

castSHG

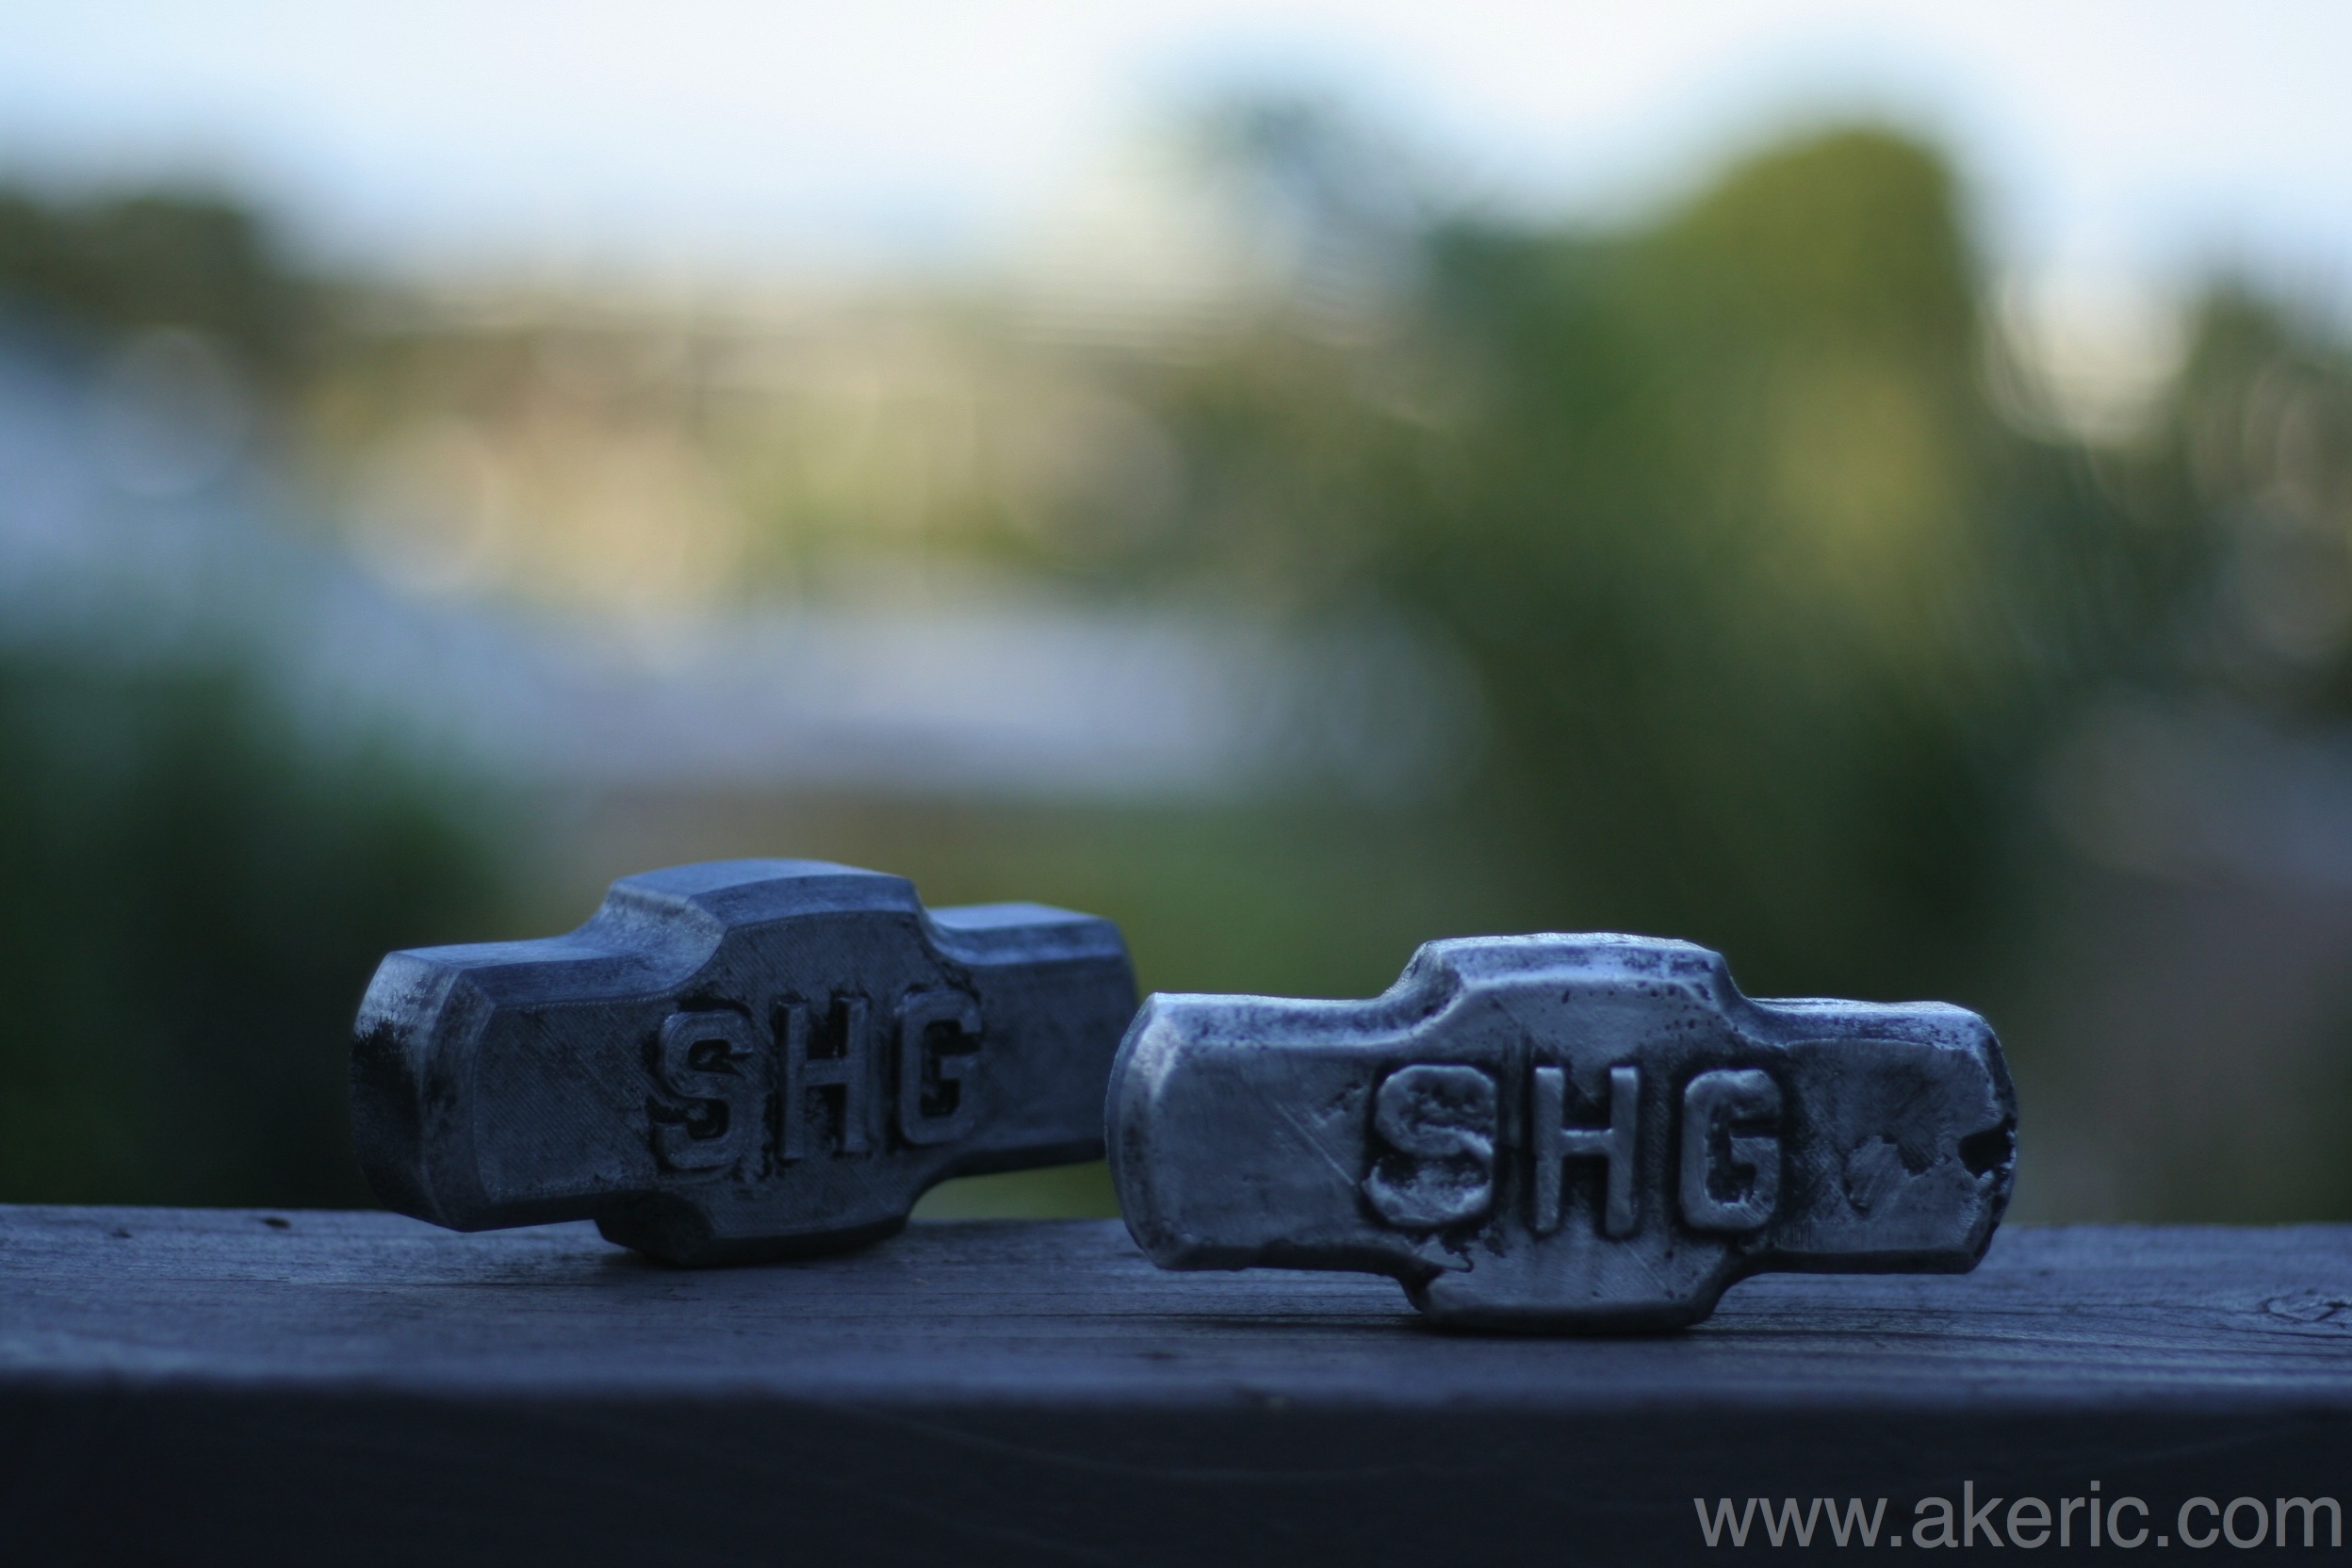
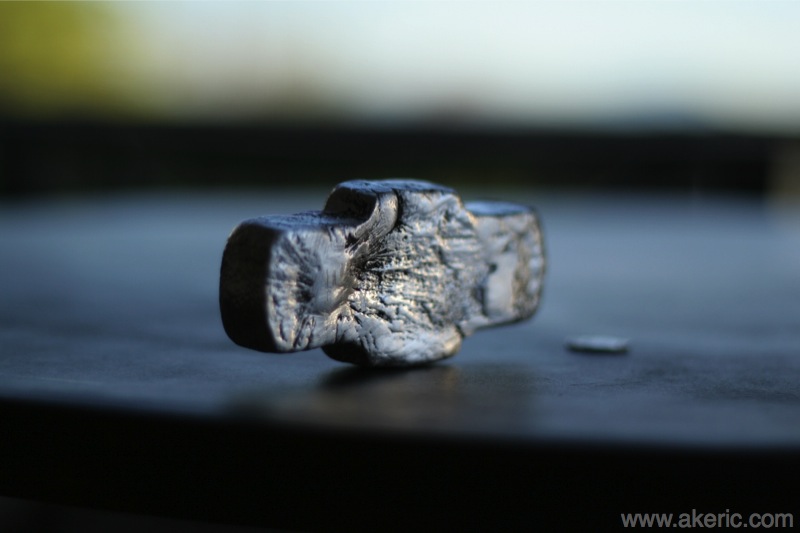
3D print on the left, aluminum cast on the right.

I’ve had a “dream” for a number of years now to model something in 3d, 3d print it, and cast it in metal.  Based on the upgrade from my “flowerpot furnace” and the acquisition of new sand casting greensand, today was my first successful attempt (once again casting my companies logo).  I’d previously tried my hand at some “lost PLA casting“, but the end results weren’t satisfactory.  And honestly I’d give today’s attempt a C- : Being my first attempt, I had some flaws in my sand cast design, that resulted in defects in the end result.  I also learned that if you want to pull off embossed letters like shown, you need to bevel them, or the sand will stick to them upon removal (which is what happened to the S & G) even if using parting dust.  Regardless, the cleaned up results with some black paint added gives it a rustic \ worn look.  Next attempt I’ll shoot for a solid B 😉

The print itself took about 2hr 15min on my Makerbot Replicator (1), using gray PLA, 200 micron resolution, printed on a glass build plate with blue painters tape.  It’s about 13cm across, or just over 5”.


Lost & Foundary “Model A” Furnace: First Melt

I finally decided to upgrade from my “flowerpot furnace” to something slightly larger, slightly faster, and quite a bit hotter:  the “Model A furnace” from Lost & Foundry.  Very pleased with it:  Fired right up, and I had molten aluminum 15 minutes later.  Next up, some real sand-casting.

Lost PLA casting: Take 1

I’ve been experimenting with some backyard sand casting, and have had the desire to try and cast a 3d-printed object. I’d heard you can do a “lost PLA” cast, where the molten aluminum vaporizes the printed item, so I thought I’d give it a shot.  Long story short:  Works… sort of.  This is my first try, so I didn’t really know what to expect, but the results were far less than I wanted:  No detail in the object, and not all the PLA totally melted: I printed the object with only 5% infill and 1 shell (to generate as little material as possible).  Regardless, it does make a good conversation piece 😉  In the future I’m going to get better sand (finer grain, better clay binder) to help preserve the detail, and probably try for a real lost-wax solution (3d print a mold for the wax), or a true sand-cast where I remove the item to be printed and simply fill the void with metal.

The end result is (an attempt at) the logo for the company I work for, Sledgehammer Games  (a sledgehammer head seemed something worth forging):

hammertime

A dime is next to it for scale

You can see on the left and right sides where I had to grind off the sprues.

Here’s a shot of my “flowerpot furnace” in action melting the aluminum for the project:

And one with the top removed, showing the red-hot crucible:

First steps with the Adafruit Trinket

I recently picked up a Adafruit Trinket (3.3v), simply because they’re so cheap (about $8).  I like the idea of a tiny small Arduino-ish board.  Since I’m forgetful, below documents the overall process I got to get it working.

End result:  Franken-servo!

End result: Franken-servo!

Resource Links:

First Steps:

For all the documentation on the web, I really wasn’t sure where to start.  There’s all this talk of installing AVRDUDE, etc, but as it turns out it’s really not needed (if using the Arduino IDE). Here’s the streamline approach I finally took:

  • Setup my pre-existing Arduino IDE for use with the Trinket, following these Adafruit docs.
  • Since I’m on a Mac, I didn’t have to worry about installing any drivers, but the “Mac Arduino IDE” app download they provided didn’t work.  Mac said it was “corrupted”.  So instead I had to use the “Slow Way” example they gave.  And other than a few path differences it worked just fine.

Programming:

  • I was able to successfully run all their examples from the page “Programming with Arduino IDE“.
  • Earlier in the day I had done some servo programming on an Arduino, and I wanted to emulate it on the Trinket.  Thanks to the “Trinket Servo Control” tutorial, and their “Adafruit SoftServo” library, I was able to make it happen.  However, I was unable to create two separate servo objects:  I think I don’t quite grasp the Trinket pinouts.  The above image has two servo’s hooked up to the same pin, so they move the exact same way.

So a successfully first attempt.  Next up, I really need some batteries to make a standalone project with it…

Raspberry FM Part 2, the sequal

Nearly a year ago I wrapped up a project I called “Raspberry FM“:  A Raspberry Pi based internet radio streamer coupled with a MaKey MaKey as the interface.   Why the name Raspberry FM?  It’s a mashup of a Raspberry Pi, and my favorite internet radio station, Soma FM.   It worked, but had a few problems:

  • There was no visual feedback, the MaKey MaKey was purely an input.
  • I was having a hard time getting Python to interface with with MPlayer (probably due to my own ignorance), the audio player I had chosen, so everything was done via bash.

Fast forward nearly a year:  After learning about the Mpd audio player/server, and (one of) its clients Mpc, it re-piqued my interest in programming a Python app to play music on the Pi.  Second time around, it all turned out really well:  New software combined with new hardware and a 3d-printed case turned it into a good looking compact unit.

Overview of the whole process below (pic on top, video on bottom).  During the development I decided to write my own Python music player around mpc & Adafruit’s LCD library.  At this point there are several others online, but I enjoyed coding it from scratch.

adaLcdCase

Raspberry FM Features:

  • Auto-on with the Pi
  • If no internet is present or it drops out, app will go into holding pattern until it returns.
  • Can change between any number of stations. (left\right buttons).
  • Stations are easy to add via the commandline:  No need to update Python source: SSH into the Pi, and add\remove what you need.
  • Increase\decrease volume (up\down buttons).
  • Station and song info is displayed and auto-scrolls.
  • Shutdown Pi  (select+left) or turn off program (for debugging, select+right)
  • Lots of color changing when buttons are pressed!

Hardware needed:

  • Raspberry Pi (I used a B model)
  • Adafruit RGB 16×2 LCD+Keypad Kit : Solder and install!
  • Optional:  Custom 3D printed case I designed (well, I designed the top part), download on Thingiverse.  Print & install!  Took me about an 1:20 on my Makerbot Replicator (1).
  • I stream the internet radio over cat5, but I’ve also had success with wifi.
  • I use the headphone jack for audio out.

Software needed:

  • This was all done on the Raspbian distro via NOOBS.
  • My “Raspberry FM” Python program.  Find on Bitbucket.
  • You’ll need Adafruits CharLCDPlate library.
  • FYI, I coded this all via the Adafruit WebIDE, I’d recommend anyone else to use it as well to help manage the various Python modules on the Pi.
  • MPD & MPC:  sudo apt-get install mpc mpd

Steps:

  • I presume you already have your Pi setup.  If not, see my notes here on the general steps needed to get a Pi live and kicking.
  • Setup Pi to auto-login.  See notes here.
  • Download the Raspberry FM Python program to a folder of your choosing.  Since I coded this via the WebIDE, both the creation of my code and the integration of the Adafruit LCD modules was all handled via the WebIDE.  Make sure you download all the Adafruit CharLCDPlate modules as well and put them in the same directory.
  • Install MPD & MPC.
  • Add stations to MPC.  This is super easy on the commandline.  May I recommend anything from SomaFM?
    mpc add http://ice.somafm.com/groovesalad
  • Setup Pi to auto-run a program on start.  See notes here.  You will point that script to wherever you saved the Raspberry FM Python script.  For example, my startup.sh script looks like:
  • #!/bin/bash
    echo startup.sh : Launching raspberryFm.py
    sudo python /usr/share/adafruit/webide/repositories/my-pi-projects/Adafruit_CharLCDPlate/raspberryFm01.py
  • Restart the Pi and listen to the music!

The final result in action: