Archive for the ‘ Electronics ’ Category

Fun with Google Cardboard

A while back I’d read about Google Cardboard:  A way to turn your Android smartphone into an “Oculus Rift Lite” VR system by shoving it in a cardboard box.  I’d recently got a new Samsung Galaxy S5 and thought I’d give it a shot.  While you can order the cardboard kit online, or even cut it yourself, I found this 3d printable design on Thingiverse that fit my phone.  Several hours later I had my ‘3d printed cardboard’ (via my Makerbot Replicator 1).  But I still needed the magnets, lenses, and optional NFC tag.  Unofficial Cardboard had everything I needed (including the cardboard itself if I hadn’t printed it), and a few days later that showed up.  Other than the lenses not quite fitting (which my Dremel grinder took care of by expanding the holes in the print), and having to jury-rig a head-strap out of some nylon scrap, it worked really well:

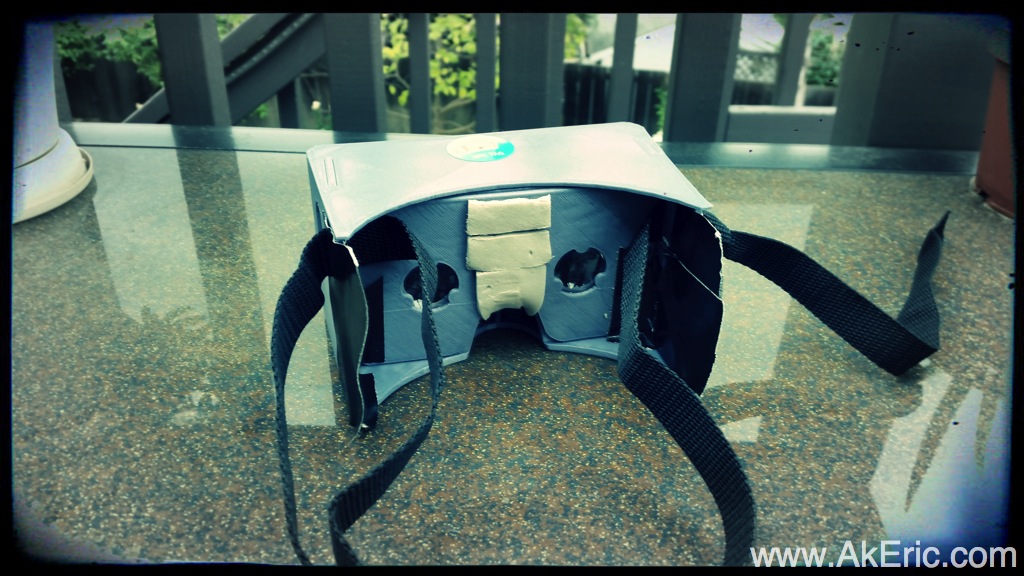
I used some sticky-foam around the nose & forehead, and inside the case for the phone to rest on.  Added extra black tape on the sides to keep the light out.

I’ve had the chance to play with the first and second gen Oculus Rift’s as well, here’s my thoughts:

  • Considering it’s a smartphone strapped to your head, it worked better than I expected.
  • Doesn’t have the immersive feeling the Rift does:  More like you’re looking through two small holes (well, you are) rather than being enveloped in the environment.  But the resolution (at least that of my phone) seemed comparable to the Rift, or at least the first gen rift.
  • Latency isn’t as good as the rift, but as a tech demo, seems good enough.  Some apps are smoother than others.
  • Couldn’t get the NFC tag to work.
  • Works with glasses.  The Oculus doesn’t, requires you to swap lenses (but this helps with its immersive environment).
  • The official “Google Cardboard App” has a number of demos.  The ones that impressed me are:
    • Earth : I found myself unconsciously laughing while using this:  Flying from space down to your house is something I’ve never experienced before.  Way cool.
    • YouTube:  A 360 deg sphere of youtube vides to watch, with voice search.  Reminds me of something from MTV in the 90’s.
    • Windy Day:  Stylized 3d short about forest animals and a hat.

The main problem I encountered was many apps require a bluetooth gamepad to navigate them.  After much searching, I’ve had a really hard time finding one that is known to work without requiring root access to the phone.  All the posts I find say “you need a bluetooth gamepad”, but give no examples.  I went to Gamestop and purchased a Moga Pocket, but it looks like that controller only works with apps designed for it.  I downloaded three different driver apps that support the Moga, and while they all recognized it, I couldn’t get it to interact with any of the Cardboard apps.  Frustrating.  Returned.

And, like on the Oculus, I do get a bit motion-sick after using it for a while.  That’s probably the biggest hurdle that needs solved for any of this tech.

Overall, it has great ‘wow factor’ the first time you use it.  I think it’ll be fun to show friends.  Currently I see no killer app for it, or any reasons I’d want to use it for anything day-to-day.  But I look forward to finding out what that may be 😉

Total cost (not counting the phone), about $16:  Print, maybe $2-3 in materials.  Unofficial Cardboard Kit: $12.75

Worth it? Absolutely.

New 3d print: Lumihedron

My previous “Dodecahedron” print was a trial run for making something bigger.  From my GeoLight print a year and a half ago, I’ve found the idea of making lighting via 3d-printing fascinating. Lumihedron is my current exploration.

You can download it for print over on Thingiverse.

Fully printed its diameter is just under 10″:  I designed a single pentagonal volumes to nearly fill the build plate on my Makerbot Replicator (1).  Each  volume took 4 hours to print * 12 prints = 48 hours of print time.  All PLA.

The whole fixture is held together via zip-ties except the bottom pentagon:  It’s held by neodymium magnets embedded into the print itself, held in place by super-glue:  By removing it, you can  replace the light.  A 60 watt Cree LED bulb is screwed into a repurposed shop-light from Home Depot fits perfectly in the top, while a custom printed clamp screws onto the base holding it in place.

I painted six of the twelve pentagons matte black on the outside, and gloss-white on the inside.  While looking pretty cool in person, they don’t photograph well, so have been turned away from the camera in all the below shots (you can see them in the window reflections though).  The other twelve pentagons are natural PLA.

I designed it in Autodesk Fusion 360, to help teach myself the software, going through 5 different revisions.  I’ve been enjoying the software, except the weekend where the cloud service went down and I couldn’t access any of my work:  They really need fix that ‘obstacle’ to design.

Really enjoyable & fulfilling project.

lumihedron_tableFar_fancy2

lumihedron_endtable_fancy lumihedron_tableClose_fancy

Time-lapse photography with the Raspberry Pi

Thought it would be fun to setup a time-lapse rig with my Raspberry Pi & it’s camera, having never tried that type of photography before.  A bit of afternoon coding, and success:

11 hours compressed to 60 seconds.

This is what the camera-rig looks like:

SAMSUNG

Used some MircoRax to create a simple frame for the Pi & its camera.

Install dependencies

You can download my Python time-lapse code here.   For the below examples, just stick it in your home (~) folder.

It calls to the fantastic picam library.  Install:

sudo pip install picamera

Record the stills

Executing the timelapse.py code is easy:  It will create a /time-lapse subfolder where it will place all the jpgs.  It doesn’t need any arguments to run:  In that case, it will record for an hour, with enough images to make a one-minute long video at 30fps:  It’s designed to take the guesswork out of trying to figure out how many frames to render at what interval based on the framerate.  It handles it all for you behind the scenes. Plus it’s all configurable.  To query the help:

$ python timelapse.py -h
usage: timelapse.py [-h] [-ct float] [-dur int] [-fps int] [-xres int]
                    [-yres int] [-q int] [-y int] [-m int] [-d int] [-hr int]
                    [-min int] [-s int]

Time for time-lapse! To start recording at a certain time, pass in any or all
of the time related args. If no time-related args are passed in, recording
will start immediately.

optional arguments:
  -h, --help            show this help message and exit
  -ct float, --captureTime float
                        in HOURS, default 1.0
  -dur int, --duration int
                        of final movie in SECOMDS, default 60
  -fps int, --framesPerSecond int
                        of final movie (default 30)
  -xres int, --Xresolution int
                        of image (default 1280)
  -yres int, --Yresolution int
                        of image (default 720)
  -q int, --quality int
                        of jpeg from 1-100 (default 85)
  -y int, --year int    ...to start recording
  -m int, --month int   ...to start recording
  -d int, --day int     ...to start recording
  -hr int, --hour int   ...to start recording
  -min int, --minute int
                        ...to start recording
  -s int, --second int  ...to start recording

So for example, to capture for 12 hours, and end up with a 1 minute long video:

python timelapse.py -ct 12.0 -dur 60

It also supports a delayed start, if you pass in any of the time values.  For example, if you pass in an hour, it will wait for that hour to start recording.   If you pass in a minute, it’ll wait for that minute of the current hour, etc.  You can pass in any of the year, month, day, hour, minute, second, or none.  If none, it starts capturing immediately.

Finally, I’ve learned that if you’re logging in via ssh, you should launch your code via nohup:

nohup python timelapse.py -ct 12.0 -dur 60

If you don’t do that, when you close the remote shell, it’ll kill the process, and no timelapse for you!

Make a movie

After you capture all the stills, how to make into a movie?  The mencoder software can be used on the pi for that.  I found a tutorial here that provides a solution.  To install:

sudo apt-get install mencoder

First make a list of files from your /time-lapse folder (from the above tutorial link):

cd time-lapse
ls *.jpg > stills.txt

Then, to convert them into a movie with mencoder (modified version of the above example):

mencoder -nosound -ovc lavc -lavcopts vcodec=mpeg4:aspect=16/9:vbitrate=8000000 -o tlcam_01.avi -mf type=jpeg:fps=30 mf://@stills.txt

Copy to your PC

This will create a new avi file on the Pi.  To get that moved to your PC, on Mac/Linux you can use scp (below example is my Pi’s IP, change it to match yours).  Note, the below code is executed from your PC, not the Pi, and copies it to my Mac’s home folder:

scp pi@192.168.2.27:~/time-lapse/tlcam_01.avi ~/tlcam_01.avi

Or you can use this great tutorial on how to use SFTP via FileZilla, if you’re more comfortable in a windowed environment.

Once I got my first movie copied over, I couldn’t play it (on my Mac) via the Quicktime player.  However, my install of VLC opened it no problem.  From there it was uploaded to YouTube: Done!

First steps with the Adafruit Trinket

I recently picked up a Adafruit Trinket (3.3v), simply because they’re so cheap (about $8).  I like the idea of a tiny small Arduino-ish board.  Since I’m forgetful, below documents the overall process I got to get it working.

End result:  Franken-servo!

End result: Franken-servo!

Resource Links:

First Steps:

For all the documentation on the web, I really wasn’t sure where to start.  There’s all this talk of installing AVRDUDE, etc, but as it turns out it’s really not needed (if using the Arduino IDE). Here’s the streamline approach I finally took:

  • Setup my pre-existing Arduino IDE for use with the Trinket, following these Adafruit docs.
  • Since I’m on a Mac, I didn’t have to worry about installing any drivers, but the “Mac Arduino IDE” app download they provided didn’t work.  Mac said it was “corrupted”.  So instead I had to use the “Slow Way” example they gave.  And other than a few path differences it worked just fine.

Programming:

  • I was able to successfully run all their examples from the page “Programming with Arduino IDE“.
  • Earlier in the day I had done some servo programming on an Arduino, and I wanted to emulate it on the Trinket.  Thanks to the “Trinket Servo Control” tutorial, and their “Adafruit SoftServo” library, I was able to make it happen.  However, I was unable to create two separate servo objects:  I think I don’t quite grasp the Trinket pinouts.  The above image has two servo’s hooked up to the same pin, so they move the exact same way.

So a successfully first attempt.  Next up, I really need some batteries to make a standalone project with it…

Scrolling the Adafruit 16×2 LCD+Keypad

I wanted to add additional functionality to my Raspberry FM project by having any long station names \ song names scroll on the Adafruit 16×2 LCD+keypad for Raspberry Pi: While the lcd Python module Adafruit provides has methods to scroll the text (scrollDisplayLeft, scrollDisplayRight, autoScroll), I was unable to get them to work nor find any good examples.  Maybe it’s completely possible with what they provide, but I had no luck with it.  If anyone does know how, please comment! :)

Why not write my own?  That’s a fun thing to do on a Saturday afternoon, right? 😉  Find a snapshot of the Python source below, and a link to the most current version on Bitbucket here: lcdScroll.py

To see it in action:

It’s a standalone module I designed to work with any sized lcd:  It’s really just a text formatter:  All the drawing to the LCD would be handled by some other application.  A very simple example can also be found on Bitbucket here: lcdScrollTest.py Or of course you could check out the Raspberry FM source here:  raspberryFm01.py

For either the top or bottom line, if they are longer than 16 characters (which is completely adjustable based on the type of lcd used), they will auto-scroll.  If less than 16 characters, no scrolling happens.  So you can have completely independent scrolling on any line based on their length.

#!/usr/bin/python
"""
lcdScroll.py
Author             :  Eric Pavey 
Creation Date      :  2014-02-08
Blog               :  http://www.akeric.com/blog

Free and open for all to use.  But put credit where credit is due.

OVERVIEW:-----------------------------------------------------------------------
Create scrolling text on a LCD display.  Designed to work on the the 
Adafruit LCD  + keypad, but it's not tied to any specific hardware, and should
work on a LCD of any size.

See lcdScrollTest.py for simple example usage.
"""

class Scroller(object):
    """
    Object designed to auto-scroll text on a LCD screen.  Every time the scroll()
    method is called to, it will scroll the text from right to left by one character
    on any line that is greater than the provided with.
    If the lines ever need to be reset \ updated, call to the setLines() method.
    """
    def __init__(self, lines=[], space = " :: ", width=16, height=2):
        """
        Instance a LCD scroller object.

        Parameters:
        lines : list / string : Default empty list : If a list is passed in, each 
            entry in the list is a  string that should be displayed on the LCD, 
            one line after the next.  If a string, it will be split by any embedded 
            linefeed \n characers into a list of multiple lines . 
            Ultimately, the number of entries in this list must be equal to or 
            less than the height argument.
        space : string : Default " :: " : If a given line is longer than the width
            argument, this string will be added to the end to help designate the
            end of the line has been hit during the scroll.
        width : int : Default 16 : The width of the LCD display, number of columns.
        height : int : Default 2 : the height of the LCD, number of rows.
        """
        self.width = width
        self.height = height
        self.space = space
        self.setLines(lines)

    def setLines(self, lines):
        """
        Set (for the first time) or reset (at any time) the lines to display.
        Sets self.lines

        Parameters:
        lines : list : Each entry in the list is a string
            that should be displayed on the LCD, one line after the next.  The 
            number of entries in this list must be equal to or less than the 
            height argument.
        """
        # Just in case a string is passed in, turn it into a list, and split
        # by any linefeed chars:
        if isinstance(lines, basestring):   
            lines = lines.split("\n")
        elif not isinstance(lines, list):
            raise Exception("Argument passed to lines parameter must be list, instead got: %s"%type(lines))
        if len(lines) > self.height:
            raise Exception("Have more lines to display (%s) than you have lcd rows (%s)"%(len(lines), height))            
        self.lines = lines
        # If the line is over the width, add in the extra spaces to help separate
        # the scroll:
        for i,ln in enumerate(self.lines[:]):
            if len(ln) > self.width:
                self.lines[i] = "%s%s"%(ln,self.space)

    def scroll(self):
        """
        Scroll the text by one character from right to left each time this is
        called to.

        Return : string : The message to display to the LCD.  Each line is separated
            by the \n (linefeed) character that the Adafruit LCD expects.  Each line
            will also be clipped to self.width, so as to not confuse the LCD when
            later drawn.
        """
        for i,ln in enumerate(self.lines[:]):
            if len(ln) > 16:
                shift = "%s%s"%(ln[1:], ln[0])
                self.lines[i] = shift
        truncated = [ln[:self.width] for ln in self.lines]
        return "\n".join(truncated)