Posts Tagged ‘ Maya

New 3D Print: Giant ‘P’

Most of my ‘big’ prints on the C-Bot have involved vases:  Large flat bases, thin walls, print fast.  I wanted to try something more ‘structural’:  Dense & flat & strong, but still take up most of the build volume.

So I printed a giant P: (you know, for ‘P’avey)

  • 500 micron layer height, 1 shell, 2 floor, 2 roof, 20% infill.
  • 1mm E3dD-v6 Volcano nozzle printing @ 30mm/sec.
  • Fans on at layer 3, 25%.
  • 210 deg blue GizmoDorks PLA on glass plate covered in wood glue slurry.
  • Modeled in Maya, sliced in Simplify 3D.
  • Just over 4 hours to print.

Came out really well actually, only thing that could be better is the top surface quality:  I either need one more roof layer (currently 2), or I’d need to up the infill to a higher percentage so the bridging wasn’t so far.  And it stuck really well to the wood-glue slurry on the glass build plate.

Making (real) aluminum boats in Maya : The Results

Back in Feb I blogged about how I collaborated with my father (in Alaska) to help him design a new aluminum boat.  Using Autodesk Maya, and a napkin sketch he made, we worked together (remotely) to susout the dimensions.  By giving him files he provided to the local plasma cutter, by Feb (nice and cold up there) he’d got the bulk of it welded together.

A week ago I was able to spent a week up there, an amazing experience as always (pics here).  And one of the highlights was being able to finally (drive &) ride in the boat.  Was a great experience, and super interesting for myself to recognize the physical representation of the Maya model floating in the water.  It’s a thing of beauty:

boat_fixed

I only wonder how long until he builds another…? :)

Building the C-Bot 3D printer: Part 27 : First ‘really big’ print

Jump to C-Bot blog index to see all the posts.


Emboldened by the success on my previous ‘big print‘, I thought I’d go for a ‘really big print’:  Something that would really take up the whole build volume.  In Maya, I quickly modeled up a simple vase, sliced it in Simplify3D, and a few hours later, I had a… really big vase :)

Print specifics:

  • Size:  20″ tall, base diameter of 11″.  Could go an inch larger in each direction, but didn’t want to push it (yet).
  • Sliced in Simplify 3D, ‘vase mode’: 1 shell (plus no floor or roof, its a tube)
  • Gray PLA
  • 500 micron layer height, 1.0mm E3D Volcano nozzle
  • 250 deg extruder temp, 50 deg bed
  • Print bed:  Glass, slathered with wood-glue/water mix.
  • Print speed:  45mm/sec
  • Total print time:  3 hours, 9 minutes.  Adding a floor would have definitely pushed the time up.

Learnings:

  • I’m happy with the print quality, but I can see where the neck narrows how the filament isn’t being cooled enough (gets slightly lumpier compared to the larger base):  I have a pair of 20cfm fans on order to see if this helps:  My current fans are around 4cfm each, which isn’t nearly enough considering this machine easily pushes out 3x the volume of material compared to my Replicator1, at a higher temp.  And the cooling fan I have on my Rep1 has around 8cfm.
  • Once I bolt the printer down to the table it’s on, it should help lessen the vibration that comes from all that moving mass up on top, and get better quality.  On the todo list…
  • Even though I have all my stepper voltages tuned in, my Bowden extruder stepper was still getting pretty warm after about an hour, so I pointed a fan at it.  Didn’t want a repeat of before

Jump to C-Bot blog index to see all the posts.

Making (real) aluminum boats in Maya

render_persp

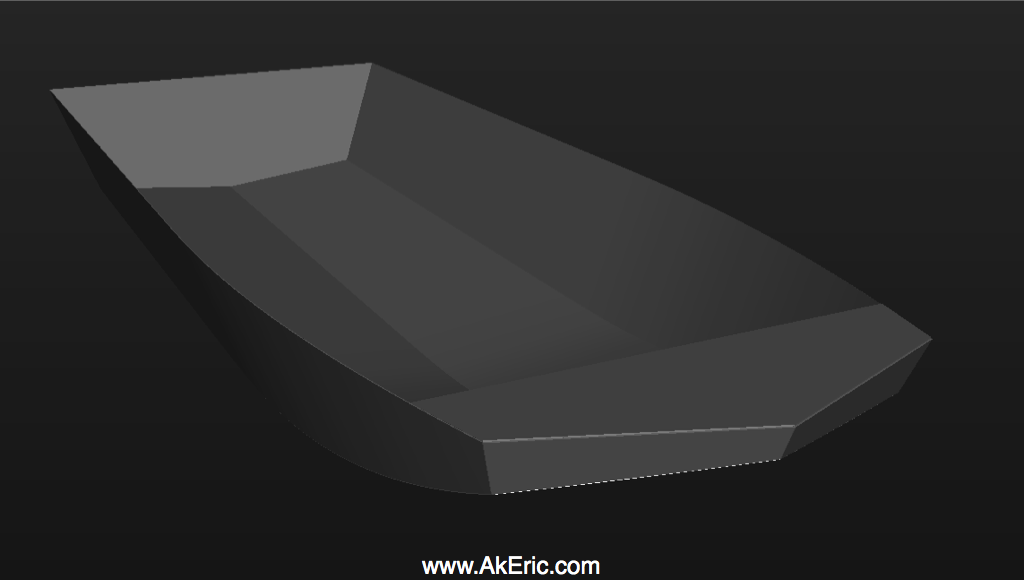
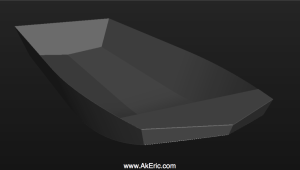
Maya render of the boat

pops_bro_boat

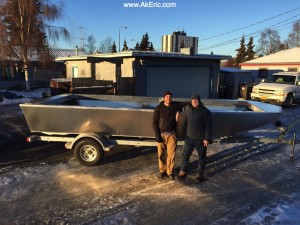
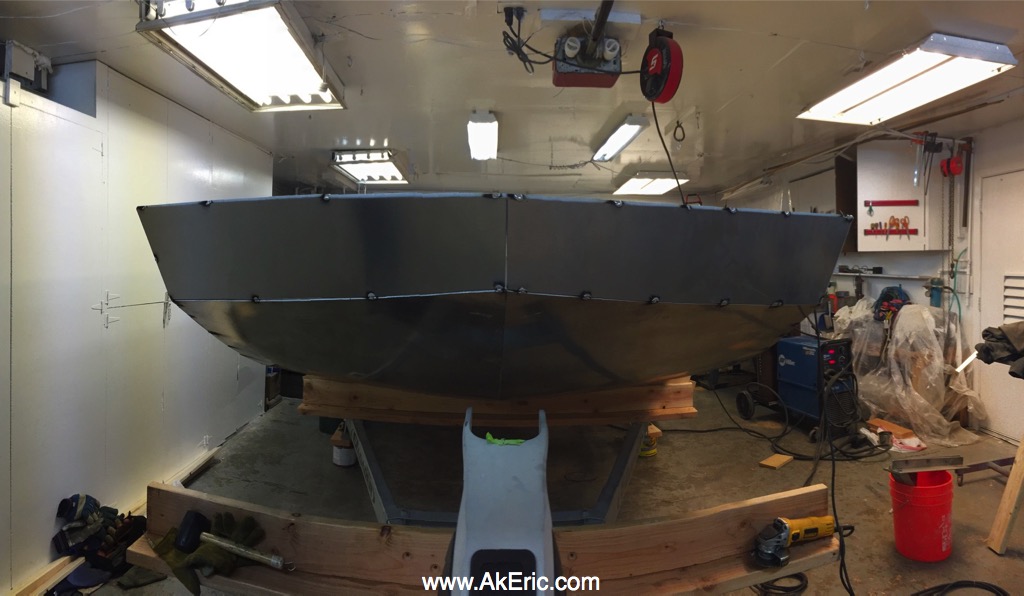
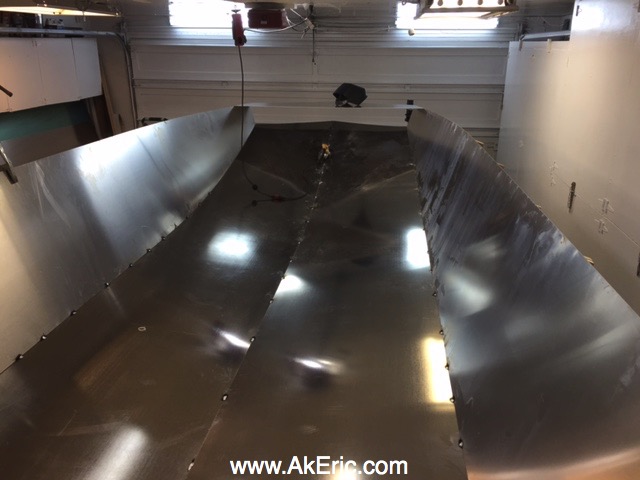
Current state of the boat, with my father and brother.

My father has been building boats since before I was born and running them on the rivers of Alaska:  Fiberglass canoe?  Check.  Flat-bottom wooden riverboats with dual outboards?  Check.  Should I mention the hovercraft? 😉  Over the past decade he’s branched out into welded aluminum flat-bottom riverboats with great success:  Make one, use it for a few years, sell it and make an upgraded version.  (On a side note, I can’t wait to retire… <wink>)

Late last year he came to me wondering if I could help with the design:  Could I create the 2d design files he would provide to a local plasma-cutter to cut the main boat forms?  Sounded like a good challenge, and a great opportunity to collaborate with my father (He’s in AK, I’m in CA).  Up until then he’d get the huge sheets of aluminum and cut them by hand.  Having a plasma-shooting robot do that sounded like a more exciting (+ accurate/faster) solution.

My father provided me the drawn plans with angles and dimensions:  I started the process of turning those into real 3d forms.

Initially I attempted to do the whole project in Autodesk Fusion 360:  I’d been teaching it to myself, but I was still very much a noob in the software.  Unfortunately I just couldn’t get it to do what I wanted:  Most importantly I couldn’t ‘unroll’ the 3d forms to 2d forms, which is needed for plasma cutting.  I worked directly with their support on this, but the software just wasn’t quite there yet.

So I decided to do it all in Autodesk Maya (which I’ve been using since it was released in ’99).  While Maya is great for games\film\vfx, I’d never much considered it for accurate CAD-style modeling.  However, it ended up working great. Here are the main takeaways on how I built the boat:

The initial boat model:

  • I started by modeling the real-world size sheets of aluminum out of NURBS planes.
  • I snapped and rotated the pieces together to get the overall shape of the boat based on the provided angles.
  • I applied bend deformers on a single axis to shape the NURBS into the correct swept forms.
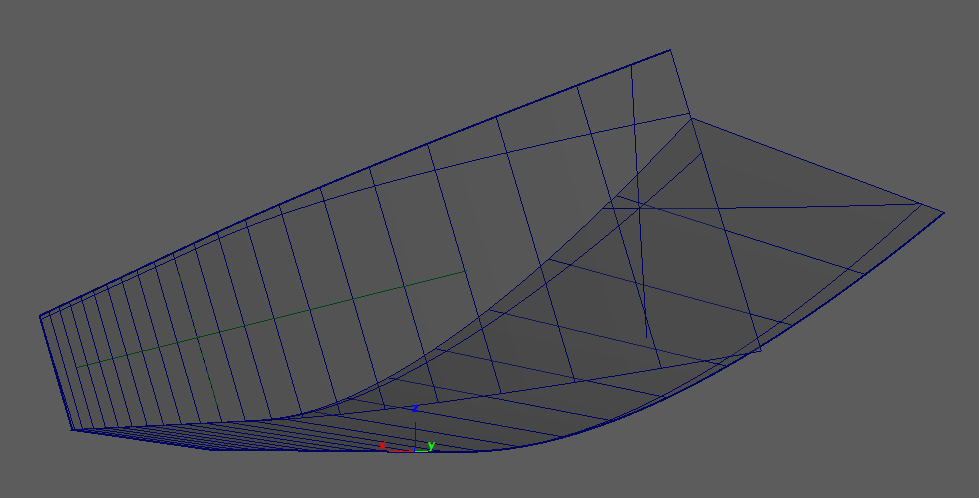
  • Based on all the intersecting NURBS, I created curve-on-surface intersections:
intersectingNurbs

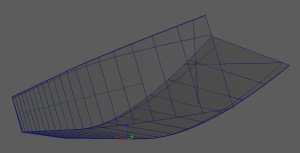
Right side bent NURBS intersection, with curves-on-surface, before trim.

  • Based on those intersections, I trimmed away the excess aluminum (NURBS).
  • Boat model complete! (see above render)
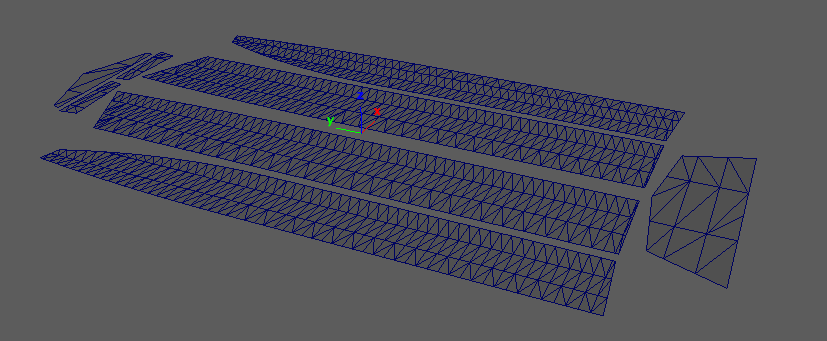
The unwrapped form:

  • I needed to ‘unwrap’ all the bent surfaces back to flat planes for export.
  • To do this, I would duplicate each of the bent/trimmed NURBS, convert them to polygonal mesh, and wrap deform the polys back to the original bent NURBS.
  • On the original, I’d access the bend deformer, and zero it:  This would flatten out the wrapped polys.  I’d delete history on the polys, leaving it flat, then bend the original piece back.  I’d then scale it perfectly flat, since the wrap wasn’t 100% accurate.
  • I’d repeat that process on each bent piece, ultimately giving me unwrapped flat pieces for all parts of the boat:
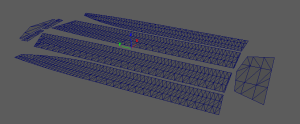
unrolled

Unrolled polys

Exported 2d data:

  • I exported each polygonal mesh as obj.  I then used online software to convert the obj to pdf’s, which the plasma cutter could use.

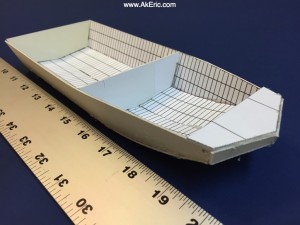
After my father got the 2d data he printed a scale model on paper, affixed it to poster-board, and made a small-scale mockup as a sanity check:

paper_boat


From there, it was off to the plasma cutter…

And the most amazing part?  It all worked:  After my father got the pieces back from the plasma cutter and starting tacking them, they all fit perfectly.  Sighs of relief on all sides.

While it’s been fun to 3d print small items, it was super rewarding to see a much larger-scale 3d model become reality, and do some ‘real’ work with my father.  I can’t wait to ride in it!


Update:  See the final results here!

New 3D Print : HexVase 04

This vase was created entirely to test Simplify3D‘s “vase mode” feature: It prints the walls as one contiguous corkscrew spiral. Turned out great.
Modeled in Maya.  Printed on my Makerbot Replicator (1).

Download the files for print and get more info over on Thingiverse.

[sketchfab id=”15be6cd9211c49c1aface6807498c7ce”]