Posts Tagged ‘ inventables

X-Carve : Designing a dust shoe for the DeWalt 611 Router

Disclaimer:  3d printing and/or using this material in any form releases me from any liability:  Use at your own risk.  I will not be responsible for any damage to person or property based on use of this material in digital or physical form.


(now that we have that out of the way…)

Intro:

While there are a number of ‘upgrades’ for the Inventables X-Carve I’ve read about, the most important one to me is a dust collection system.  There were a couple of options I found on the forums, but none that fit the 2.5″ line I wanted to use to hook to my Rikon Dust Extractor: It actually has a 4″ hose coming out of it, which I step down to 2.5″ into my Oneida Dust Deputy, then run another 20′ over to the X-Carve.

After a couple weeks of modeling in Maya (not necessarily a CAD modeler, but I make tools in Python as I need them to suffice), printing prototypes on the C-Bot, I finally have something functional:  v.A05.

I wanted to provide this to the X-Carve community as a big thank-you to all the forum peoples that helped me along the way.

If you make one for yourself or anyone else please:

  • Give credit.
  • Make for friends, but don’t sell it for profit.
  • Please reference the CC Attribution Commercial 3.0 license.
  • Feel free to improve, but see above.

If you’d like me to print one for you, contact me (warpcat at gmail dot com) for cost & shipping.

A shot of it disassembled:

final_proto

Prototyping:

It was (as expected) quite a learning experience, and I went though a number of revisions to get to this point:

prototypes

Prototypes from right to left:

  • Initial wood prototype cut on the X-Carve.  Very quickly I realized that I know a lot more about 3d printing than cnc routers.
  • Blue #1 : Rough 3d shapes, good starting point.
  • Blue #2 : More stylish, actually functional.
  • Grey #1 : I started doing two-part cuts with tool-swaps, and realized that I should have a quick release.  This one has the vertical slotted section held in place by four powerful magnets to the main body.  Technically works, but has too much play and slop.  Also has a groove in the bottom for the strip brush.
  • Grey #2 (mounted to the machine) : Current iteration.  No quick disconnect, but very rigid, and easy to remove the two screws.

Features of v.A05:

  • Connects firmly to left side of the spindle mount, using 2 bolts.
  • Tapered hole for the 2.5″ line, allowing for friction-fit of the dust-line.
  • See-through window providing visual access to the bit, and for the dual-lights of the DeWalt 611 router to shine through.
  • Groove in the base to allow for the insertion of a strip brush.
  • Allows for adjustable height to better fit your bit length.

Bill Of Materials

  • 3d Printed Dust Shoe.  Download the stl on Thingiverse here.
  • Clear acrylic for the window.
    • I bought a sheet of 2.5mm / .0975″ Lexan at Orchard Supply Hardware that worked well.  Could double that thickness and still have room.
  • 2″-ish Strip Brush.
    • I used this “Easy Cut Strip Brush” from McMaster-Carr.  You’ll need a little less than 17″ for the perimeter slot.
    •  What you get is up to you, but I’d advise on getting the softest possible bristles.  The bristles for the listed brush are too stiff IMO, FYI.
    • See specific notes below on issues with this.
  • Hot Glue
    • For strip brush and window adhesion.
  • 2 M4x12 Socket Head Cap Screws.
    • Used to bolt the print to the router bracket.
    • McMaster-Carr Link
    • I bought mine at Orchard Supply Hardware.  10mm would probably work fine too.
  • 2 washers.
    • For the above M4 screws.
  • 2.5″ Swivel cuff hose attachment.
    • I got mine at brick & mortar Woodcraft (can you believe it was cheaper than Amazon?)
    • Swivel is important to allow the hose to not bind in the shoe.
  • A bunch of 2.5″ hose to connect to your dust collector.

Build Instructions

  • 3D print the dust shoe stl file:  I would highly recommend to print this as strong as possible.  If you’re using a .4mm nozzle, I’d do 3-4 shells, 25-50% infill.

(This video was actually of one of the prototypes, but you get the jist)

  • Carve the acrylic window on your X-Carve.  Easel file here.
    • Note, as modeled, the diameter of the larger dual circular apertures is 6.5cm each.  As printed on my C-bot, they are 6.4cm each.  I designed them in Easel to be 6.3cm, and it fit perfect after cut.
    • cutting_lexan
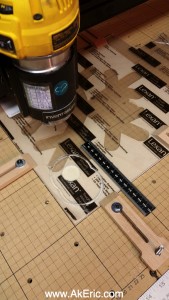
    • I used a 1/8″ single flute up-cut bit, default Easel settings for that material, DeWalt 611 speed of 1.
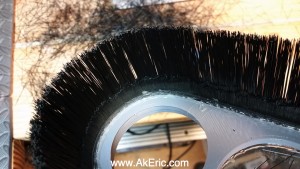
  • Cut your strip brush to length, and insert into the channel on the base of the shoe.  But first, read the below notes.
    • Super important notes on the strip brush:
    • Based on the version I purchased and listed above, I found that the bristles were far too stiff, based on the number of them.  Because of this, as the toolhead would change direction, the pressure of the bristles on the head would actually lift it on z during movement change.  Not so good.
    • Suggestions:
      • I ended up cutting out 3/4 of the bristles, on the inside of the strip.  If you go this route, I advise you do this before you mount it:
      • cutting_bristles Cutting in-progress.
      • Buy much softer bristle strip.  I’ve seen horse-hair as an option, that may work well.
      • Cut the bristles shorter.
    • Based on how I designed it, the strip was easy to fit into the side channels, and I used a screwdriver to help ram it into the turns.
  • Use hot-glue to run a bead around the inside of the strip-brush & dust shoe to stick it in place.
  • Mount the window in the top of the dust shoe, and run a bead of hot-glue around it’s perimeter to stick it to the shoe.
    • Note, a heat-gun will soften the glue for removal if needed.  Just don’t damage the print.
  • Slip the shoe over the bit into the router mount, and attach with the M4 socket screws & washers.  I use two.
  • If you haven’t already, screw the swivel-cuff into your 2.5″ line.  Then press it into the hole in the shoe, slightly twisting to get a good friction fit.  Be sure to hold the shoe from the bottom during insertion, not the vertical side piece, so as to not torque the print too much.  If you have any concern of this fit, you can run a bead of hot-glue around it too.

Use Instructions

  • Raise the shoe up as far as possible to get the bristles level with, or slightly higher than the bit.  Be sure to not block the down-vents from the router with the window:  Give it some space.
  • Be sure nothing can collide with the shoe, specifically material clamps.
  • While running it, check how much pressure is being put on the bristles:  Make sure they’re not causing any binding.  Trim as necessary.  Or buy softer bristles.

Specs:

These are as designed, not necessarily as printed.

  • Width : 105.5mm
  • Height : 178.4mm
  • Depth : 124.9mm
  • Strip-Brush channel:
    • Width: 6mm
    • Height: 5mm-ish
    • Note the channel is rotated 10deg, so the brush will flare slightly out.

Future Improvements:

  • I’d still like a better quick-release for swapping bits.  Removing the two screws isn’t hard, but I’d like it to be “more slick”.
  • I need to find a better solution for the bristles.  Either softer, or less of them (I may have more cutting ahead of me).

But for right now, I need to actually start making stuff on the X-Carve, rather than for the X-Carve :)

X-Carve CNC learnings : MeshCAM, touchplates, Chilipeppr, & multi-pass cuts

It’s been great having two weeks off over the holidays, and a newly assembled X-Carve.   Following up on previous posts, this is more learning, saved on the web for my future reference.  Current CNC skill level = noob.

MeshCAM

meshCAMWhile Inventable’s Easel ($ = Free) is great, I’ve quickly exhausted it’s capabilities.  Specifically, I want to model 3d objects in Autodesk Maya, and mill them on my X-Carve.  Currently Easel does 2D (cutouts) 2.5D (cutouts at multiple heights) but not full 3D objects.  Reading the forums there appears to be several popular software packages out there that do what I’m after, two of which include MeshCAM ($250-$500) and VCarve ($350-$700).  My issue is I’m on a mac, which is very limiting in the world of CNC as I’ve learned, so I can’t even test V-Carve :-(  MeshCam it is!

MeshCAM does give you a nice fully featured trial period (couple weeks) to check it out.  And it does exactly what I’m after:  Creates multi-pass (roughing, finish) toolpaths based on my 3d objects.  Pros is that it does that well!  Cons is that the UI feels a bit antiquated compared to most 3d software I use, and I can’t really find any robust instructions online (they do email you a tutorial a day once you get the trial though).  But it gets the job done.

List of tutorials I’ve found:

Other Links:

And, it exposed the first issue that prompted this whole post:  Since it provides for multi-pass cuts (requiring a tool change), how can I actually implement them?

Touchplates

To dotouchplate a multi-pass cut (as I’ve been learning), you generally use a big fat bit on the roughing pass to remove a bunch of material, then a finer bit on the finish pass to make it look all nice.  But this obviously means you need to swap bits.  And if you swap bits, how can you guarantee that the Z-height is the exact same on the finish pass as it was on the roughing pass?  Since when you remove bitA and add bitB, there’s no way a human can guarantee the tip of bitB is at the exact same location that bitA’s was.

Reading the forums it quickly became apparent that I needed a ‘touchplate’ : A chunk of metal of a known thickness you can use to effectively ‘close a circuit’ with the spindle bit:  When that circuit is closed, you know you’ve hit the top of the material you’re about to mill (with the bit a known distance above it).

I fashioned my touch-plate out of a scrap of 1/8″ aluminum my father had given me from a previous boat build:  Drilled a small hole in one end, affixed a wire to it through a bolt tapped into it.

From there, per the forums, I connected that to the Arduino Uno’s A5 pin, and another wire with an alligator clip on the end to it to the gShield’s ground.  The main issue is the analog headers on the Arduino are hard to get at because of the gShield on top, but I was able to get a small lead plugged in (see below image).

wiring

But once it was all wired up, how to test, and ultimately use?

ChiliPeppr

ChiliPepprchillipeppr is something I only recently learned about:  A tool for sending gcode to your device, supporting tinyG and Grbl (which the X-Carve uses), and ‘generic serial’. The Universal GcodeSender (Grbl only?) was a close second (and I got it up and running, which required a frustrating update of Java on my mac), but honestly ChiliPeppr just looks cool while you’re using it.  While Easel allows you to send gcode to the gShield, I couldn’t actually get it to execute the (below) touchplate gcode:  The machine would just make a weird vibrating sound.  Could be my complete lack of knowledge on the subject, and I wanted to learn how to use ChiliPeppr anyway.

The first stumbling block was figuring out how to connect ChiliPeppr to my X-Carve (since there are no instructions for ‘first time users’ I could find) : As it turns out, based on the smallish screen of my Macbook Air, the menu on the bottom right that lets you “Download Serial Port JSON sever” wasn’t visible.  You need to install and run that server (a shell pops up to let you know its running) to allow ChiliPeppr to talk to the X-Carve.  Once that was done, I was in business.

One thing I’ve noted about ChiliPeppr every time I’ve used it to make a cut (total of three times now) : It seems to randomly pause.  I have to “unpause” it, and it happily goes along it’s way.  Not sure what is causing this, nor can I find any errors/warnings shown.

Other ChiliPeppr links:

Multi-Pass Cuts

Being the CNC noob that I am, since I couldn’t find any docs for this (meaning, using a combo of MeshCAM, Chilipeppr, and doing multi-pass, tool-changing cuts) anywhere.  So below is a rough outline of my experience doing just that:

  • In MeshCAM I created both a rough and finishing pass, and saved out the gcode using the “Shapeoko GRBL-Inch” postprocessor.
  • I drag & dropped that .nc file into ChiliPeppr.
  • In ChiliPeppr, I used the jog controls to move my toolhead to the bottom-left corner of where I wanted the cut to start.
  • Using the touchplate, I put it under the toolhead, connected the alligator-clip to the it, then created a ChiliPeppr JavaScript macro:
    • macro.sendSerial(“G20\n G92 Z0\n G38.2 Z-.5 F1\n G92 Z.124\n G0 z.25”);
    • The above (modified) code is thanks to a X-Carve forum post by user CharleyThomas.  The raw code on a single line looks like:
    • G20; G92 Z0; G38.2 Z-.5 F1; G92 Z.124; G0 z.25
      • G20 : set to inches
      • G92 Z0 : Zero the Z axis, I added this later:  Before I added this, there was a bug that the first time I’d run the macro, the toolhead would go up, not down.  There was some speculation that since the coordinate system wasn’t set yet, the machine thought the toolhead was too low, and would auto-raise it.  Regardless of the issue, this command solved it.
      • G38.2 Z-.5 F1 : Move the spindle down half an inch max looking for the touchplate
      • G92 Z.124 : Set the z-height to the thickness of the touchplate (mine is .124″)
      • G0 z.25 : Raise the spindle to 1/4″ above the material.
    • Note, as I was authoring this, I realized ChiliPeppr has a ‘Touch Plate’ widget, but I have yet to investigate it.
  • From there I turned on the spindle, and fired off the gcode.
  • When it paused for toolchange, I swapped the bit, then re-executed the above steps with the touchplate and macro to re-zero the z-height.  Then unpaused it to continue the work.

Worked like a charm:

final_pass

In the above pic you can see the finish pass emerge from the rough.

All in all, a pretty rewarding experience.


Building the X-Carve CNC Router

Disclaimer:  I have no affiliation with Inventables.  I’m writing this review purely as my initial experience with this tool.


xcarve_assembled

I’ve been 3D printing for over 3.5 years now, and it’s been an extremely enjoyable hobby:  The transition from my virtual work in video-games to tangible objects has been surprisingly fulfilling.  Which has lead me to aluminum sand-casting, and I dabble in wood-working in my spare time as well.  The more I 3d print, sandcast, and woodwork, the more I want to make… more things, with new methods.

Over the past few years there has been an emergence of desktop CNC machines, and after much research (thanks to Make Magazine, and the internets) I settled on the 1000mm X-Carve kit, by Inventables.  It arrived earlier this month, and I’ve been spending a few hours a day putting it together.  Finally, on Christmas, I finished it up and made my first cuts.

Why did I choose it?

  • Honestly, I really liked how it looked.
  • Had the biggest footprint of the popular kits.  I don’t know what I want to make yet, but I don’t want to feel limited in a year.
  • Amazing online instructions and videos I was able to research ahead of time.
  • Active user community in the forums.
  • Their CAD/CAM software, Easel.  Sort of like CNC training-wheels:  I can imagine eventually growing out of this software, but in the beginning it gives you a great, gentle introduction into this world, and was a huge selling point.
  • A good collections of projects to start with.
  • Entirely Open Source.  While I really have no problem with closed-source, I give them kudos for this.

At first I considered doing a series of blogs like when I assembled my C-Bot 3D Printer.  But very quickly I realized I don’t think it would have been a value-add to the internet:  Inventible (as mentioned above) has amazing online instructions, for which I have very little to add.

Inventables claims you can assemble the whole thing in eight hours:  I believe that is possible.  While I didn’t time myself, I’m guessing I took around twelve total, really taking my time.

Things that impressed me during the build:

  • As mentioned above, the great online instructions and videos.  It assembled exactly as described.
  • Packaging of all the parts:  Everything was individually bagged with a serial number, making it easy to confirm I’d collected the correct parts for each step.
  • Nothing missing:  Every piece accounted for (but a single damaged nut, see below).

General Gotchas:

  • One nylon lock-nut was damaged.  Looks like during manufacturing it got squished beyond usability, and was missing its nylon insert.  Since they give you exactly the number of parts you need, I ended up one nut short.  Luckily my parts bin had something that worked.
  • If you use a router like the DeWalt 611 that has ‘manual spindle control’ (I didn’t even know what that meant until building this), but ordered the wire for ‘automatic spindle control’, you can get confused, if you’re a noob like me:  Since the overall instructions are done so well, when something doesn’t make sense (what is this wire for?  How do I hook it to my router?), it’s actually even more confusing because you think you’re missing something.  In this case no, I wasn’t missing anything, the instructions just presume you know a bit more in this area than I did.
  • While you can order a toolkit with it (which I did not do), nowhere I can find do they list the tools you need.  For example, you’ll need a soldering iron, to do some (pretty simply) solders.  I can imagine that if you’ve never soldered anything before, this may cause anxiety.  Plus you need a number of metric hex-wrenches, a carpenters square, etc, etc.  A tool-list would be nice.  Maybe I’m just missing it…?
  • No dust-shoe.  I find it surprising they don’t provide one (for purchase), considering how much dust this thing makes.  There are a multitude of DIY ones the forums though, and will be one of the first things I build to accompany it.
  • In Easel, I have yet to find a way to manually jog the steppers, other than going through the “Set up you machine” phase.  In the 3d printing world, manual stepper control is pretty commonplace to help move the toolhead around the bed.  Maybe I’m missing this too?
  • The top of the DeWalt 611 router hits the top of the Z-assembly, near where the leadscrew affixes to its belt.  Reading the forums people claim you can turn it to move the colliding bits out of the way.  I was unable to achieve this, and used my belt-sander to grind off a good 1/8″ of plastic and metal.  Problem solved, but seems a bit clunky.
  • The shipping cost of the 1000mm wasteboard is crazy (That sized wasteboard + hardware is $128, and the shipping is more than that).  Being a CNC noob, I didn’t know how important it was to get that wasteboard, are all those holes needed, etc?  Because of that, I ended up ‘just getting it’ (thanks to a $100 off special before Christmas, which I mentally ‘applied to shipping’).  They do provide the cad files online (being open source and all) so you can make your own, presuming you have access to a… CNC router.  And there is discussion on the forum over wastebord options, but it’s a bit scattered, and not entirely clear to a new user.  I think if Inventables provided a way to manually build your own wasteboard using say, a table-saw or circular-saw and some MDF, it’d go a long way to attracting new users that couldn’t afford the shipping.  Are all those holes needed?  No.  But they are handy.

First Cut:

xcarve_firstCut

After the machine was assembled and I ran through their Easel tutorial, I created my own “Merry Xmas”/snowflake combo (shown above).  Affixed a 5.5″ x 5″ x .75″ block of scrap wood to the wasteboard, installed my 1/8” dual-flute ball end (which as it turns out, is the smallest bit I ended up buying), and started cutting.

Thoughts:

  • Cutting seemed slow (based on my CNC Experience Level 1).  I have a feeling the software was just being safe using the defaults.
  • I’m still learning Easel, and got the order of the snowflake and text wrong, so the snowflake blocked the text, rather than the text cutting the snowflake.  Live and learn.
  • All things considered, super simple to do.
  • I need to get a dust-shoe setup.

Final Thoughts:

Overall, I give this build and initial use a solid A.  Far less work than my C-Bot build (which admittedly was muuuuch more DIY).  I really look forward to learning the world of CNC, and how it can compliment my 3D printing.