A comparison of Simplify3D and Slic3r Prusa Edition

I printed so many 3dBenchies for this comparison….
Preface
I’ve been a 3d printing hobbyist for right around five years now: I purchased my first printer, a Makerbot Replicator 1 (which I still own, still prints great) in March of 2012. Since then I’ve used multiple slicers to generate my gcode, but mainly (and in order): ReplicatorG, MakerWare (now MakerBot Print), and Simplify3D. And for the time I used them, they’ve all been great. I’ve also built my own printer a few years ago.
However, and as much as I like Simplify3D:
- Despite it does so many things so well…
- The fact that I paid cash money for it.
- And that their updates are so few and far between…
- And the updates don’t include fixes to some major issues I feel it has…
I thought I should revisit what slicer software 2017 has available.
I know that slicer software is like religion, politics, and CAD software: People can get very attached to them. And there’s a good chance someone out there is going to disagree with my findings : That’s great, I’d like to hear your perspective, leave a comment below. Everyone uses the software differently, and the things I find important (or not) could be polar opposite of someone else.
Based on a general poll I posted, it looks like these slicers are out in the wild and commonly used. Yes, there are more, but these seem to be popular:
After reviewing all of them, and for reasons listed below, I decided to investigate Slic3r Prusa Edition. And mainly that edition over vanilla Slic3r because vanilla Slic3r hasn’t been updated since mid 2015, while the Prusa edition is being actively developed (+ extra fancy features). I know vanilla Slic3r is still being developed, it’s just been a while since an official release has gone out.
Update: As it turns out, dev releases of vanilla Slic3r are generated often, so it’s pretty easy to be on the cutting edge, find downloads here.
This is not a post designed to bash Simplify3D and espouse the values of some other slicer: My goal is to make it an honest comparison of the two software. It should be noted however, I have over two years of experience with S3D, and only a few weeks on Slic3r, but so many of the concepts of the software overlap, I feel I have a pretty good grasp of it.
Finally, why am I writing this? It’s taken quite a while to do all the research! Mainly for myself actually: I wanted to get all my research down on paper to see if I should make a slicer switch or not. There are so many facets to all of this, I wanted to get it in one place to make sure I wasn’t missing anything.
I will continue to update it over time, see bold “Update” text below.
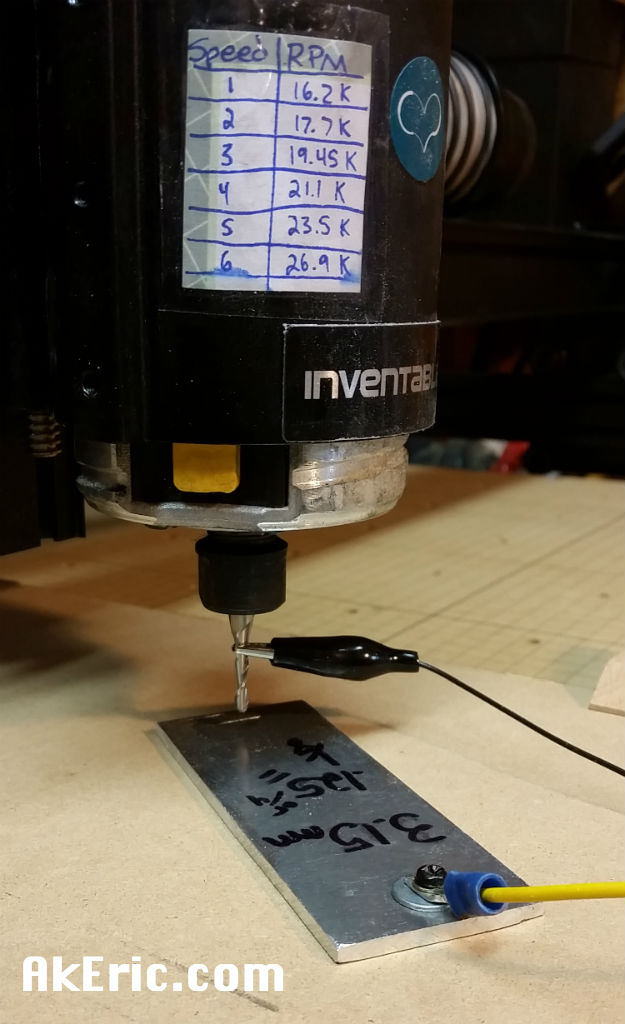
What I used for testing
- 3D printer hardware:
- My custom core-xy C-Bot : It has a 12x12x21″ build volume, auto-leveled on a heated, removable, mic6 aluminum bed covered in a PEI sheet.
- Runs RepRapFirmware on 32-bit RADDS/Due electronic.
- All steppers set to 1/128 microstepping using SD6128 drivers.
- I currently print mainly MakerGeeks PLA out of a .6mm E3D-v6 Volcano nozzle at 230 degrees on a 60 deg bed, with active PLA cooling from a ducted 24cfm fan.
- 3D Model: I used the good’ol 3dBenchy as my test model for all comparisons, except the thin-wall compare, it’s linked to below.
So let’s get into it…
Simplify3D
Version Tested: 3.1.1
- Homepage
- Documentation (unofficial)
- Changelog
- Forum
Unique things it does well
These are things I’ve found it to do, that other slicers may not. Or it does better.
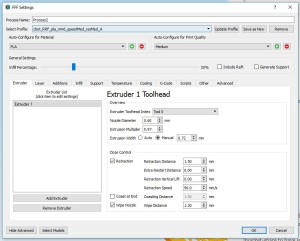
- Multiple ‘Processes’:
- A process in S3D is basically a print preset. And you always need at least one:
 x
x
- The power comes into play however, that you can assign them per mesh to print (if there are multiple being printed):
- Or by layer height:
- You can even ‘group’ processes so as to link their similar parameters together, so changing one changes all others (see how this works here). This is extremely powerful, and arguably one of the best parts of the software. And when I need it, it’s great. But honestly 95% of the time I don’t need it.
- Not that it effects me so much, but it has pre-configured profiles for many printers, allowing a larger market-share to have success with the software sooner.
- I should note that I’ve found no other slicer that treats “processes” as well as S3D. This is a major selling point, and brings much power and convenience when needed.
- A process in S3D is basically a print preset. And you always need at least one:
- Print options:
- In its ‘Advanced Mode’, there’s a knob to tune just about every aspect of your print.
- Post processing of gcode:
- You can modify the output of the gcode via S3D’s own custom syntax. You can see this post on an example of how to do it.
- Printer communication & machine control panel
- S3D has a robust “machine control panel” for operting your printer, issuing gcode, printing gcode either over USB, or via SD. It also allows you to make your own macro’s that show up in the UI.
- Manual supports:
- An area where S3D really shines, is how easy it allows you to place and generate your own support material (vertical columns).
- Even in ‘manual’ mode, you can place them ‘automatically’, then add/remove them as you need. A nice feature is you can toggle on/off ‘from built platform only’, so you can generate automatic supports for everything touching the bed, the later add in manual supports as needed elsewhere.
- Support removal has always been great.
- Technical support:
- Yes, they actually get back with you if you email them with a problem.
- Active forums:
- Linked above: A very active community.
- Gcode previewer:
- Does a great job displaying gcode through a variety of filters (print speed, feature type, etc).
- Slicing speed:
- Fastest slicer I’ve ever used, 3DBenchy sliced in 1 second.
- Print results:
- There’s no question that once you get your settings tuned right, S3D produces great results.
- Object transformation:
- In addition to translation\rotation\scale of parts on the build platter (either via a manip, of numeric entry), you can also specify dimensions, and it will scale to match. Handy.
- Multi OS support:
- I’ve used it on powerful PC’s, and pretty old Mac’s, and it’s never had a problem.


Things it does not do well
This list is the main reason I started looking for other slicer options. The “Major Issues” are things that I personally feel really, really need to be addressed.
- Thin wall detection:
- “Major issue“: If you have a wall that’s .5mm thick, but you’re printing with a .6mm nozzle (or extrusion width), S3D won’t print it. This drives me (and many others) nuts, considering old slicers like Makerware handled this just fine. Simply having the ability to ‘opt in’ would be great. Since I print with large (.6 -> 1.2mm) volcano nozzles, it means many files are simply unprintable.
- Automatic supports:
- “Major issue“: S3D does a great job with manual supports (that you place by hand, which can be accurate but time consuming), but it’s automatic supports (most commonly used) are some of the worst I’ve seen, because… it doesn’t support any type of stalactite (or icicle) like feature. While the supports it creates are fantastic, and remove great (better than any other slicer I’ve used), when it fails to create them at all where it should ‘automatically’, that’s a major failure. I have an ongoing thread here with plenty of pics showing this problem. This is a straight up bug that other slicers don’t have any problem with. In fact, Simplify3D, KISSlicer, (Update:) CraftWare and ideaMaker have this problem: Cura, Makerware, Slic3r, and ReplicatorG all handle this just fine . Here’s an informative pic with the problem. Just imagine how this can make your prints fail, I’ve had many wreck because of it:

- Cost, no trial version:
- That about says it all. I’ve been told they’ll refund you if you don’t like it after you buy it. But seriously, there should be a trial for software like this for new people
- Timely updates
- They have maybe one update a year… and since it’s closed source software, you have no idea when its going to be released, or what will be in it. And the last update was pretty lackluster as far as major bugfixes (anything on this list) or improvements.
- Listening to their community:
- While they do have tech support (that does respond), they seem to be completely absent from the forum. Which I personally find quite questionable, since it gives the impression they don’t care about their user base. There can be a certain topic that has 5 pages of people voting it up, but you never hear if the developers know, or care.
- Toolpath simplification of high res mesh:
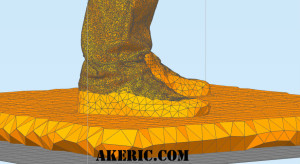
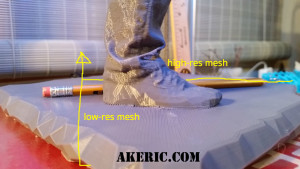
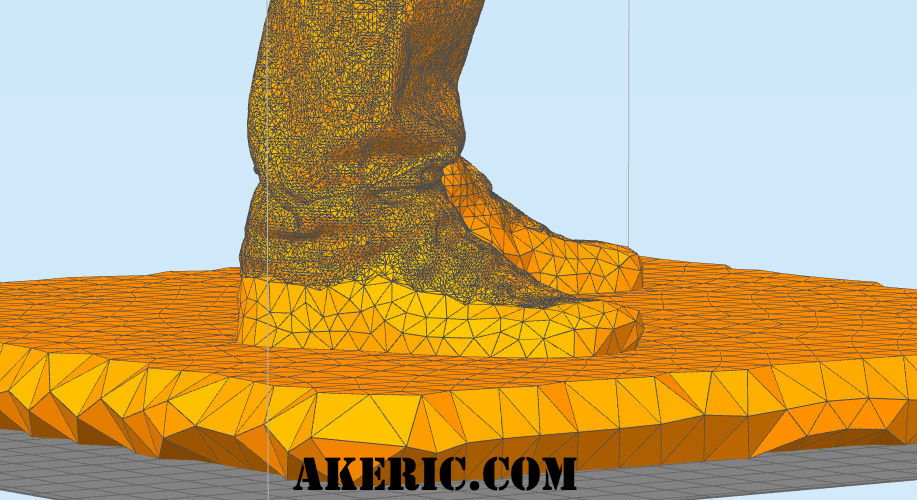
- “Major issue“: This is another major gripe of mine I’ve talked with tech support about, and they seem to have no want to address: If you pass in a very high-res mesh from zbrush (for example), that may have a much higher poly density that what can actually be printed, the software will do no sort of simplification on the tool path. The result is that it still tries to print all the detail, and the fallout is your print having a surface quality of oatmeal. I have example prints that show this off pretty well, as they transition from low-poly to highres mesh. Their suggested fix is that you manually decimate all your models. But this means any time I scale a model, I have to re-decimate it for that particular scale (and how do I know how much to decimate it?). That’s horrible. Considering other slicers, like ancient Makerware or Slic3r do this for you.\
- Update: This post of mine talks about the problem more, but here are some pics showing it off. If you enlarge the pic on the right the quality difference is pretty clear.
- Lumping printer settings, print settings, and filament settings into the same preset/Process.
- Not the end of the world, but since all these things are saved together, it means I need to have… a lot of processes for every speed, resolution, and filament type combo. Splitting these settings up (like Slic3r) would only make data management easier.
- Process Storage:
- Even though S3D does a great job with it’s ‘processes’, it took a step backwards with it’s v3 release: Up until then, when you’d save a process, it would save on your hard drive, allowing for multiple people to easily share process values. But with v3, all process are saved “internally” in the software, making it very hard to do any sort of distributed process sharing between employees. Yes, you can export them out to your HD, but this creates an extra, unnecessary step. The issue is discussed here.
- Update: In addition, if you ever ‘reset S3D to factory settings’, it will wipe all your custom process and firmware setups without warning. Which would be a non-issue if theses were stored on disk. I’ve been bit by this in the past, its painful.


Slic3r Prusa Edition
Version Tested: 1.33.8-prusa3d-win64
- Homepage
- Documentation (vanilla Slic3r)
- Changelog
Unique things it does well
These are things I’ve found it to do, that other slicers may not. Or it does better.
- Splitting printer settings, print settings, and filament settings into different presets.

- I love this feature. I can mix and match printer settings, print settings, and filament settings as needed. Cuts way down on the number of ‘profiles’ needed vs say, S3D. Plus they’re all saved on disk, easily shareable.
- Toolpath simplification of highres mesh:
- You can specify a ‘minimum detail resolution’ that will help it print higres mesh better. Great feature.
- Thin wall detection
- If two walls are close together, they can be collapsed into one, so as to not cause an overextrusion problem in that area. In addition, within reason (and discussed below in more detail), it will print a collapsed single wall much thinner than your nozzle width, which is desirable.
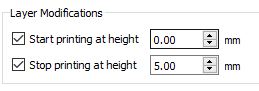
- Variable layer height
- Powerful new feature allowing you to smoothly adjust the print resolution over height. See an informative post here.
- Unique infill:
- In addition to what you’d expect out of a slicer (hexagona, triangluar, grid, etc) Slic3d has additionl types like cubic and 3d honeycomb.
- Unique top layer infill:
- Whoe doesn’t love a hilbert curve for their top layer, eh?
- Notes
- Simple, but handy: There’s a notes page for your prefs, to jot down extra info.
- Max volumetric speed:
- A handy way, mainly when dealing with bigger volcano nozzles, to limit how much material you extrude. Based on resarch, the common thought is a volcano heater can melt about 30 mm3/sec, so you can actually enter that in, to make sure you don’t try to extrude more material than you can actually melt. Which I’ve done before, it’s not good.
- Verbose cooling description:
- A little thing, but they have a human-readable paragraph describing how your print cooling fan is going to work, based on the values you set.
- gcode postprocessing via scripting language of your choice:
- This is pretty great: You can pass in code from any scripting language (Python, Perl, JavaScript, etc) to postprocess your gcode. I found this valuable when I had to modify the gcode output to support my RepRap Firmwares, by writing a custom pos-tprocesser in Python.
- Slicing speed:
- Not as fast as S3D, but still pretty fast. 3dBenchy sliced in 4 seconds.
- Update: Based on the v1.34 release, which the release notes state moved to a parallelized slicing system, dropped the benchy to a 2 second slice time. Nice!
- Print options:
- In its ‘Advanced Mode’, there’s a knob to tune just about every aspect of your print.
- Update: Octoprint connection:
- It can connect to, and upload gcode directly to Octoprint.
- Update: Run it from the command line.
- Fully scriptable from the command-line, no window needed! That’s great for custom toolchains.
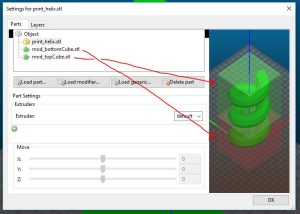
- Update: Object Modifiers
- Object Modifiers allow you to use stl files to define volumes of your print for custom print settings. This is similar to S3D’s ‘processes’, except you can use an stl to define a volume to define the custom settings, rather than just a layer height.
- You can use your own stl files, or it provides primitives like box, cylinder, sphere, and slab. With the later you only have to define a height, so it acts a lot like defining a S3D process height.
- In this example, I have a helix for print, and two cubes defining volumes for custom print settings:

Things it does not do well
- Printer communication
- The Prusa edition has the option to connect directly to your printer over a serial/usb connection, but I’ve been unable to get it to work, up through version 1.34.1.24. Just says my printer is ‘not detected’.
- Vanilla Slic3r (1.29) doesn’t have this option at all. It just means you need some other sender software like Printrun or Repetier Host (or, ironically, Simplify3D).
- The 1.3 dev branch of vanilla Slic3r does have this ability, and I have tested it successfully.
- Thin wall detection:
- This is a pro above, but I also found it to be a con: There were issues on my 3dBenchy tests (mainly the flag-pole hole on the stern) where it would collapse thin walls, but not replace them, causing gaps to form in the walls. Disabling this option caused noticeable over-extrusion in some areas.
- Update: You can track this issue here.
- Mac support: It crashes a lot on my (old) mac. No problem on my PC.
- Update : Adjusting settings print settings per model:
- Slic3r only lets you modify the ‘print settings’ per model, you can’t adjust printer or filament settings, which would help greatly.
- Update : x3g support:
- This only matters if you have a Makerbot printer (like myself), but while you can export a Makerbot-flavored gcode, you’ll still need some external tool (like gpx) to convert the gcode to x3G. Technically since Slic3r supports postprocessing of gcode, it could call out to a x3g converter via a scripting language of your choice as well.
- Update: Saving/loading ‘scenes’:
- It seems a bit awkward to save and load a ‘scene’. To me, a ‘scene’ is the current 3d mesh on the platter, plus all the current machine, print, and, printer configuration states. You can do it, but (instead of the File menu) via “Platter -> Export Plate as AMF…” (Additive Manufacturing File Format). you can later “Add” the xml file that process generates, which has the effect I’m after, it’s just a weird/clunky process.
- Update: I’ve read that per v1.34.1 it now supports a .prusa format that should handle this… but I can’t actually find that functionality in the software.
- Update : Undo : Slic3r hands undo ok inside the print\printer\filament settings, but it doesn’t work on the platter: I accidentally hit “Delete All”, and I was unable to get my data back

Comparing Simplify3D & Slic3r’s successes & failures
- Print Quality
- They both print great, in my opinion, see the below section with all the pretty pictures. After setting up similar profiles in both slicers and printing 3dBenchies, the results look different, but great.
- Overall level of print settings:
- They both provide a similar level of knobs to twist for designing your print settings. A wash.
- Setting organization:
- While Simplify 3D’s ‘processes’ are great, based on the fact that I use multiple ones so infrequently, I give Slic3r the win here, since it allows you to split you printer settings, print settings, and filament settings to separate presets, while Simply3D lumps them all into one. Plus Slic3r’s are saved on disk, while S3D hides them inside the software.
- Gcode previewer:
- S3d’s better than slic3r for the fact it has more ways to preview the gcode. However, both of them physically render the gcode about the same.
- Gcode postprocessing:
- Slic3r wins here, with it’s ability to use any scripting language.
- Printer Communication:
- S3D does a great job with its Machine Control panel. Update: Slic3r’s only seems to currently work in a dev branch.
- Supports:
- The supports that S3D actually creates (manual or automatic) are fantastic, but when it completely fails to ‘automatically’ support certain features that cause print failure, it’s just sad. Slic3r’s supports are pretty standard, but don’t fail when they shouldn’t, so it gets a win for just being status-quo. Both software could learn from the other.
- Object Transformations:
- S3D wins here, providing more tools that are easier to use.
- Tech support & forums : S3D for the win, just a bigger community (or better communication platform) it seems. It’s not that Slic3r doesn’t have that, S3D’s just seems more active.
- Thin wall detection : Even though Slic3r has some problems, the fact that it recognizes them at all (compared to S3d) is a win.
- Cost : You can’t beat free, Slic3r FTW.
- Software Updates: The Prusa Edition of Slic3r seems very actively developed… who knows when S3D will get another update, or what it will even have.
- Highres mesh toolpath simplification: Slic3r clearly wins here, realizing this is an important aspect of any highres model.
- Setting storage: Slic3r for the win here: All if it’s printer, print, and filament settings are stored on desk in ini files, easily accessed by others, while S3D hides all the settings in the software itself.
- Update: x3g support: S3D wins, supporting it natively, with no extra steps needed for export.
- Update : Slicing speed: S3D wins, but with the latest Slic3r release I tested, the gap got a lot smaller.
- Update : Scene saving/loading : S3D wins, it behaves like you’d expect any software too. While you can do it in Slic3r, it’s just a bit clunkier.
- Update : Overall experience: S3D feels like a more polished piece of software, while Slic3r sill gives me that ‘shareware’ vibe from the 90’s.
- Update: Setting customization per model / height: This is a tossup: S3D makes it easy to define processes by height, and you have full control to all print settings within. Slic3r allows you to create robust Part Modifiers, but it takes a bit more time, and not all options are available within.
- Update: Command line api access: Slic3r has it, S3D does not.
- Update: Undo : S3D handles undo great, Slic3r is missing it in some areas.
Things I didn’t test
- Supports : Since I did this entire test with the 3dBenchy, which requires no supports, I didn’t feel it was important to test them. But I’ve used plenty of supports generated by S3D in the past, and they were always easily better than the older slicers I used like Makerware or ReplicatorG. I’ve actually not ever printed supports in Slic3r, just looked at the gcode output.
- Other slicers : I was considering mixing ideaMaker, Craftware and Cura into this test… but I’d probably never have finished it.
3dPrint Comparison
I should be noted that all prints have had zero cleanup work done to them. This is to show all possible flaws.
Print Stats
I did most of my testing with the 3dBenchy model, trying to make sure both slicers had similar values. This is what I printed with:
- 280 micron z layer heights (‘medium res’ for a nozzle this size, set to full z-stepper steps).
- .6mm E3d-v6 volcano nozzle, extruding at .72mm.
- 2 shells, 3 top and bottom layers.
- Triangualr infill @ 30%.
- MakerGeeks Urban Camo PLA extruded at 230 deg, with a .97 extrusion multiplier.
- Printed at 60mm/sec with active filament cooling, and slowing layers down for details like the smoke stacks.
- The gcode for both slicers were sent over USB, via S3D.
Printer issues:
- It should be noted my bot has a slight z-wobble I’ve been working on addressing.
- Even though I think I have it tuned in for that filament, I feel like my tests were slightly over-extruding.
Print time and weight:
- Both slicers generated prints weighting 15g.
- Both prints took exactly 41 minutes.
Visual Gcode Comparison
On the left is Simplify3D, on the right is Slic3r

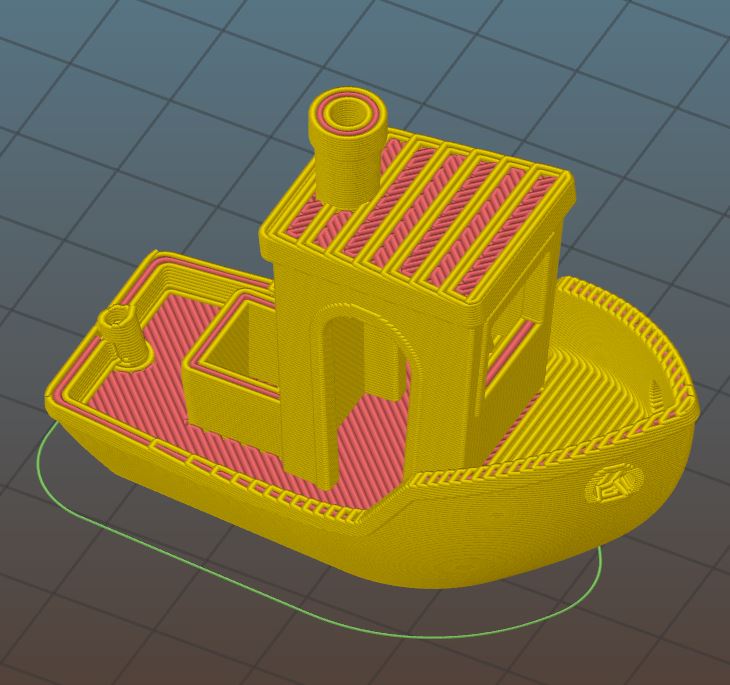
You can note the nice on-screen legend that S3D provides, not to mention it has many other display modes. With Slic3r, on the right is what you get. Visually, they’re about the same aside from the colors used.
Poll Results
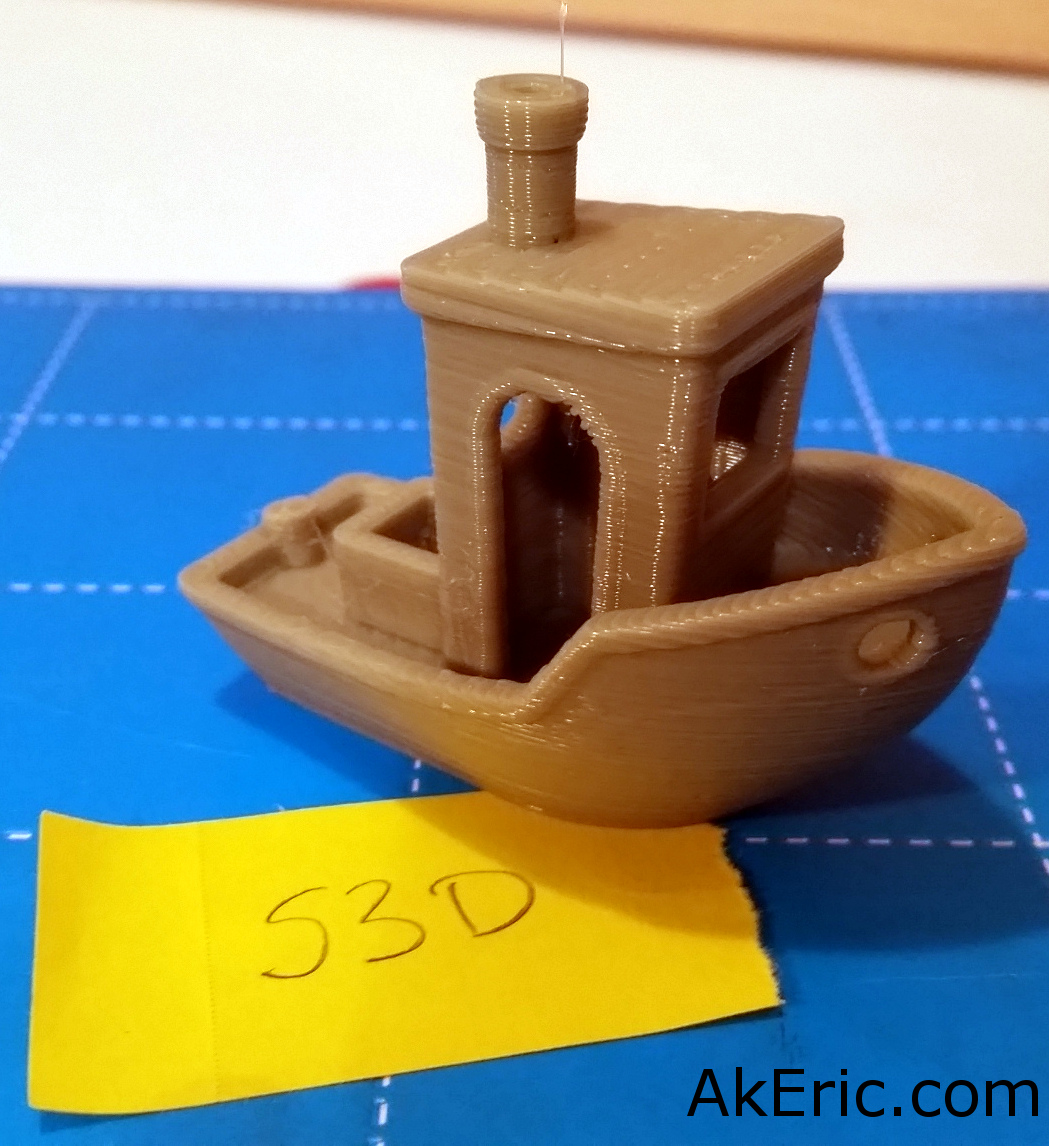
I know I’m biased about what I think are good/bad print results. I though it would be interesting to see what others thought, that really have no experience with 3d printing. I did a poll at work where I brought in benchies sliced in both software(shown in the pics below), put it in the kitchen, and over the course of the day let people vote on which they thought was ‘better’.
I had a total of 57 people vote, and by 2:1, they chose the Slic3r version over S3D. I didn’t tell them anything about how they were made other than “I’m comparing two different prints, what do you think is better?”. I should also note that a number of people abstained saying “I don’t see any difference”.
Do I feel Slic3r’s visual results outweigh S3D’s by 2:1? Not at all. But I still find the results interesting. Take them for what you will.
Visual Print quality comparison
Click on images to expand.
Side By Side
Beauty shot, side by side, S3D on the left, Slic3r on the right:

Pretty darn close! Slic3r has slightly more stringing, but at a glance they look like twins.
Individual Simplify3D & Slic3r closeups:

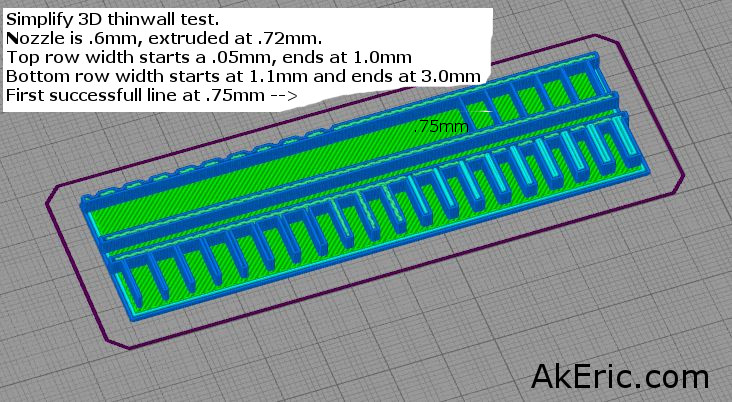
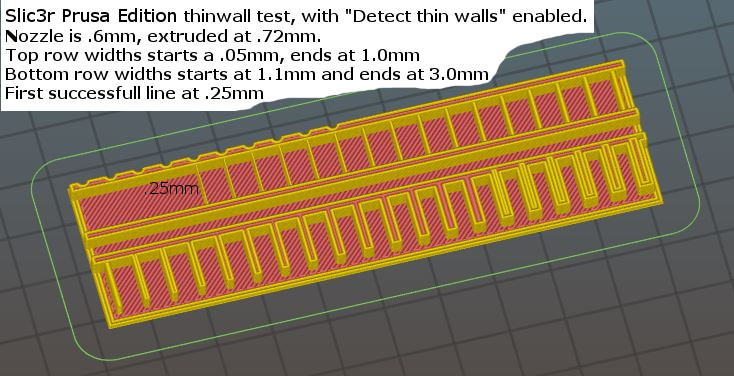
Thin wall comparison
Since the bencny wasn’t the best test for this, I down laded a “thin wall test” from Thingiverse, and ran them through both slicers. I didn’t print these, but I didn’t need to: The gcode preview tells enough.
FYI, the walls on the top start at .05mm (on the left), and end at 1.0mm (on the right). The walls on the bottom start at 1.0mm (on the left) and end at 3.0mm (on the right).
Again, I generated this gcode with a .6mm nozzle, but with an extrusion width of .72mm (20% over).
Simplify3D
Did not do well at all. It didn’t start printing until the wall with was greater than my extrusion width, so it left out all walls under .75mm. Kind of hard to print anything architectural related at scale with this limitation.
Slic3r
Did great: It was able to detect and deal with walls almost 1/3 the width of my nozzle, the first one being .25 mm wide. Note, this was with “Detect thin walls” turned on in the settings. With it turned off, it had the exact same results as S3D.
Slic3r ‘Detect thin walls’ issues
Interesting findings: As mentioned above, Slic3r allows for thing wall detection and collapse, S3D does not. The above benchy pics of Slic3r have the “Detect thing walls” feature turned on. But I figured out, it was collapsing more than it should, in the case of the flagpole : There’s a small hole in it, which is also shown in the gcode itself:
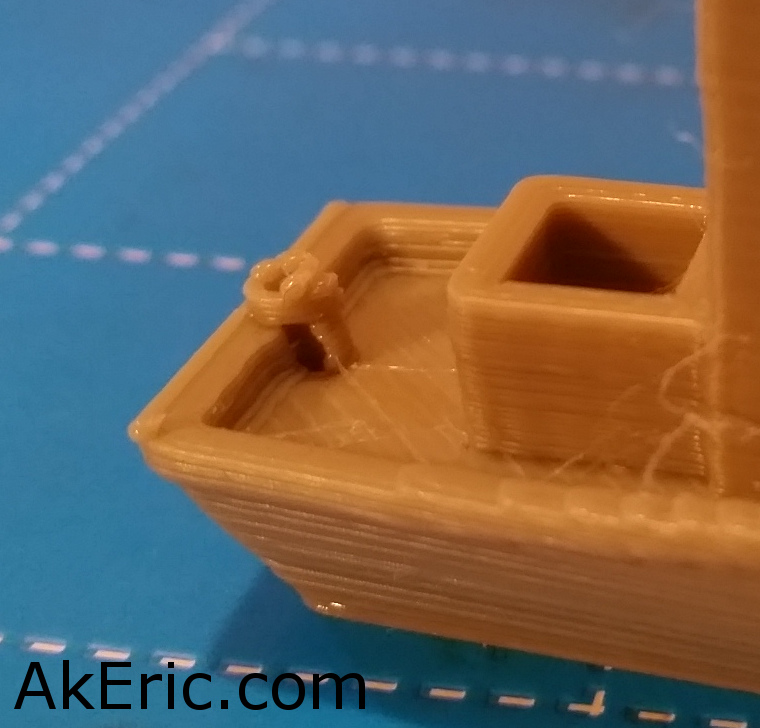

Turning this feature off fixed the flagpole, but caused a slight over-extrusion in other places, like where the bow meets the sidewalls, visualized in this comparison:

Note on the right benchy, the line running parallel to the bow, below it. But also go look at the top/first pic of the S3D/Slic3r compare above: You can see the same artifact in the S3D print as well.
The thin wall collapse does help give better definition to features though, compare the portholes in these to Slic3r prints:
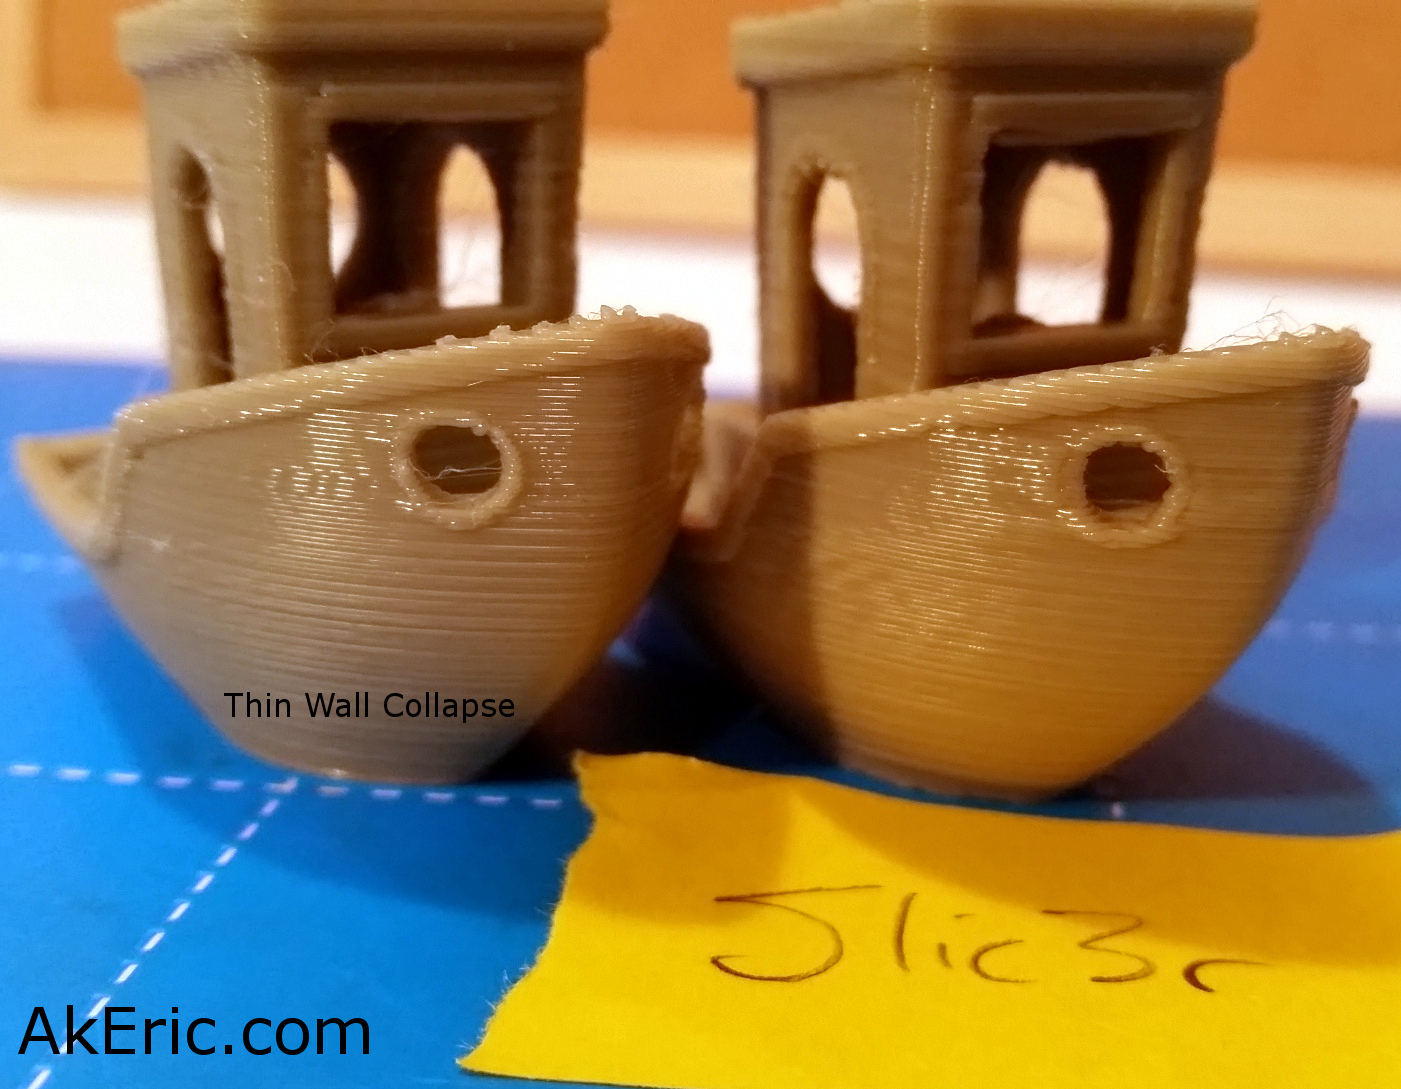
Note how the porthole on the left has better definition. It looks better than S3D’s as well.
In Conclusion
They’re both great pieces of software, and they both a have many features in my ‘pro’ sections. But based on the cost involved, how Slic3r has matured, and how few cons Slic3r has in comparisons to S3D’s cons, I’d have a hard time recommending S3D off the bat to someone new to this: Give the free software a shot.
For myself, I’m definitively going to give Slic3r Prusa Edition a look: Considering how it addresses all my ‘major con’ issues with S3D (correct automatic supports, properly handles highres mesh, deals with thin edges), I’m going to invest some serious time in it. I think sometime in the next few months S3D should have another release if they follow years past, I definitively look forward to that will bring.
Finally, I’d like to give some suggestions to the S3D dev’s if they ever end up reading this:
- Regularly comment on the forums.
- Expose upcoming features & bug-fixes that are in development: If I knew all the problems I discussed above would be fixed in an upcoming release, I’d be far less likely to spend the hours I have looking at other slicers.
- Release more than once a year.
- Basically, stop being such a black box.
- Charge a reoccurring fee rather than a single upfront lump-sum: I’d happily pay, say 5$ a month for an ongoing subscription where the above issues were met. The OctoPrint Patreon subscription model (that I contribute to on a montly basis) is a great example of this.