How To ‘Print The Bay’
Several people asked me if I’d share the specifics of how I completed my previous print, “Print The Bay“. Sure!
As mentioned in the post, I used a great (and relatively new tool) by Thatcher Chamberlin called “Terrain2STL” to do the heavy lifting of the map geometry creation: I had looked at the well documented techniques by Thingiverse user Shapespeare (aka Whitney Potter, as documented on his “Grand Canyon” thing here) and was about to start, but discovered several pieces of the software chain were PC only: I’m currently on Mac. So while I started trying to figure out an alternate pipeline, I found a random blog post on Terrain2STL, and everything changed  With Terrain2STL, it’s as easy as defining a region in Google Maps and hitting “download” to get a 3d printable stl of the terrain (although as mentioned below, some work is still needed).
After doing several test prints I got in contact with Thatcher, making suggestions as I became more familiar with the tool. One of which was a way to add “extra thickness” to the ground, and the ability to “lower” the water: In places like the San Francisco bay, much of the land is at sea level. When I’d print the map, you couldn’t tell where the shoreline was. Thatcher was able to implement these new “drop” features, and created a special “Bravo” page for Terrain2STL that exposes them.
Based on all that, here’s the overall process I used:
- Terrain2STL has a maximum capture volume (the red box it creates): Looking at the map in the software, at maximum capture size, it would take four regions to grab the area I was after (mid to south SF bay). It has restrictions though: The capture volume can’t cross over any major grid lines, so I was also gated by that spec. Since there’s currently no accurate way to do multiple captures exactly next to one another all at the same time, I’d eyeball each red capture box next to one another, using landmarks on the map (usually street labels) to line one up to the next. When exporting the data, I set “Base Height” to 4, and “Water Drop” to 2. For any future ones I do I’d probably set this to 8 & 4, simply to make the printed water a bit thicker. After download, I had four new stl’s on disk.
- The stl’s aren’t perfect though: Thatcher has been working on improving the quality of the data, but I still found a couple issues with them:
- Holes in the data: You need water-tight stl’s for printing, and these unfortunately weren’t (Thatcher mentioned the datasets the tool pulls from has ‘holes’, the tool just emulates what it finds). Trying to keep my toolchain free/open source, I turned to Meshlab: It will easily fill in holes. After bringing the stl into meshlab, access ‘Filters -> Remeshing, Simplification and Reconstruction -> Close Holes’.
- Wrong aspect ratio: When creating captured regions, based on what part of the world you’re in, the red capture region will be square (at the equator), or more rectangular the closer to the poles you get. However, the download stl data is always square. To fix this, I took a screenshot of one of my capture regions, cropping it to the exact size of the red rectangle. I then pulled up the resolution info from it (on Mac you can RMB on the file and do a “get info”), divided width by height, and I got my scale value. To set the scale, in Meshlab access ‘Filters -> Normals, Curvature & Orientation -> Transform: Scale’. Turn off ‘uniform scaling’, and set the X axis scale value to the computed aspect ratio. Optionally you could scale it in Blender (below).
- Verts stretching below the ground : It can be hard to notice when zoomed out and looking at the mesh in 3d, but on 3/4 of them there were several verts that were slightly lower than the base plane. When brought into your slice software and dropped on the build plane, this causes the bulk of the mesh to be one or more layers above the platform, and it won’t stick well at all when printed. Again, trying to keep the toolchain open source, I turned to Blender: Importing each STL into Blender, I switched to the front and side views, and scanned the bottom edges of the mesh: Any verts that were too low I simply selected and moved back up above the base layer. I then re-exported them back out as stl.
- With the stl’s ready for print, I brought them into my slicer (in my case, Makerbot Desktop) and set them to maximum size. Since I was going for a translucent effect on the ocean, I did a pre-slice preview to see how many layers thick the ocean was (in this case 2 layers), and set the firmware to pause at that height for a filament change. I started the print using translucent ‘Neon Blue’ PLA, then swapped to a light gray PLA to finish. Each region took 2.5-3.5 hours on my Makerbot Replicator 1 (Sailfish firmware).
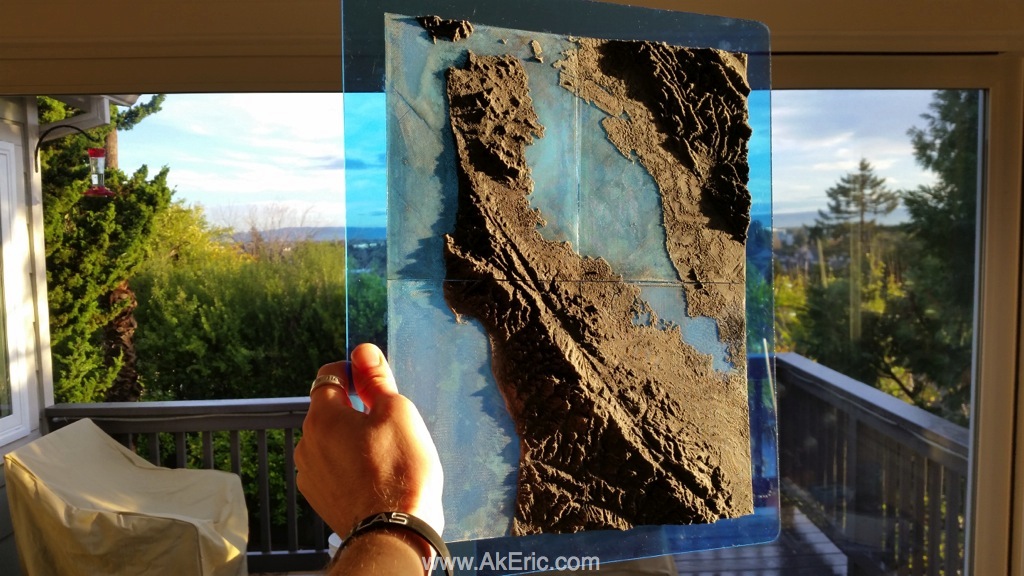
- To show the translucency of the ocean I had a custom piece of transparent light blue acrylic cut at TAP Plastics (I live close to one making it easy). While I was there I picked up two tubes of epoxy that dries clear. After cleaning the prints and acrylic I slathered a bunch of epoxy on the back of each map region, and pressed them into the acrylic, leaving it to set up for a few hours .
- I wanted to add additional relief to the mountains. To do this I shot matte-black spray-paint directly onto the mountain regions, and then quickly wiped it off with a rag soaked in lacquer thinner. Since this is PLA, there is no reaction with the thinner (ABS would be another story…).
I waited for the sun to rise, and shot the above image. Hope you find this helpful, and let me know if you have any questions.
Check out the article written on it at 3dPrint.com.