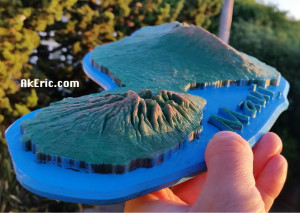
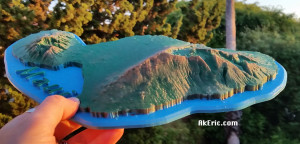
New 3D Print: Maui
I’ve 3d printed a few other maps, and got a lot of enjoyment out of it:
I recently spent a week in Maui: This gave me inspiration to do a (painted) 3d print of it on my C-Bot:
The below post is an overview of how I designed, printed, and painted it.
Getting the Mesh Data
I first headed to the web app Terrain2STL : This is the great little program that lets you download 3d-printable terrain data.
However, no matter what you set the capture-box size to, it captures the same resolution of data. If you make the box the size of the whole island of Maui, you end up with a pretty low-resolution capture mesh, based on the detail I want to 3d print. So the only way to get a ‘high-res’ Maui mesh is to download many small chunks, that will later be seamed together to build a high-res island.
In Terrain2STL, I set the box size (ARC seconds) to 360. Based on that size, I can adjust the latitude & longitude values by .1 values, to offset the box by one length in either direction. So stating at the NW corner of Maui, I started capturing squares of it’s mesh. In total, I made 30 captures.
Assembling the Mesh Data
In Autodesk Maya, I created a new scene, and started importing in each STL that Terrain2STL generated. Starting in the NW corner, I’d import in the next stl, line it up with the last, and repeat that process. Which gave me something that looked like this upon completion:
I then went through the process of deleting all the mesh that wasn’t part of the island, stretching all the edges down to make a cliff-like effect, making a base for it, and creating the text. I also did a lot of mesh cleanup since the Terrain2STL tool isn’t perfect. Final Maya result:
I tried to boolean all the mesh together, but Maya just wouldn’t do it. This left me frustrated, but I realized that Simplify3D (the slicer I use) allows you to import in multiple mesh: In Maya, I made sure the pivots of all the mesh were at the origin (so they’d all show up in Simplify3D in the correct location), the transformations frozen, and I exported every individual piece as a new STL.
Slicing The Data
I imported all the stl’s into Simplify3D: They appeared to all line up correctly. I wanted the island to be scaled 2x on the Z axis, so I grouped all that mesh, and applied the scale transformation.
But when I sliced it, I noticed lots of little gaps between the mesh chunks:
Come to find out, even though all the mesh was lined up correctly, in some cases… it just wasn’t enough for Simplify3D : This spawned a painful process of me moving pieces, re-slicing, checking gaps, etc. But eventually I got rid of them all. The general prints stats were:
- 200 micron, .4mm E3D-v6 Volcano nozzle
- Maker Geeks Gray’matter Gray PLA @ @210 deg. Bed @ 50 deg.
- 90 mm\sec print speed.
- 2 shells, 4 roof\floor. 10% ‘fast hexagonal’ infill.
Took around 13 hours to complete. Based on my 12″x12″ build platform, printed diagonally it came out to 14″ across:
Painting the model
I wanted to try a new (for me) dry-brush technique to show off the mountains.
To start, I shot the whole model in a pleasing Rust-Oleum ‘Meadow Green’ color:
After that dried, I sprayed “Maui Blue” (can’t believe I found a color that matches the medium I’m painting) onto a foam brush, and painted up the ocean. Finally, I sprayed a light-brown onto a paper towel, and then brushed it across the mountain peaks for the final result.
Was really pleased with the results!


Hi there!
My girlfriend is from Maui and I was looking to make her a 3d Model for our upcoming anniversary. Would you be willing to share the stls that you got from the Terrain2STL?
I am new to 3D printing so I am not as skilled as you are haha.
Thank you,
Sam
Since I do these for sale, I’m not releasing the stl’s I made for this specific project: Took a bit of time to to get them to the state they’re in. But using terrain2stl gets you 90% the way there, and I’d be happy to walk you through any of the steps needed. If you search back in my blog I describe the whole process in my “Print The Bay” post.
I’m interested in buying one of these 3D models. How much do they go for? And are you able to make them bigger than the one in the picture. I was thinking 2 ftish?
My biggest machine an do about 13″ around. If you want it larger than that, I could cut it up into pieces, that could be later butted together. How much it costs totally depends on the size, and how much extra work I need to put into it:
Please email me at ‘ warpcat at gmail dot com ‘ with your request, and I can get you a quote.
Also, I can CNC out of wood up to 30″ square, here’s some examples if you’re interested:
https://www.instagram.com/p/BdLyizmhBFq
https://www.instagram.com/p/BT1kBbYglxC
https://www.instagram.com/p/BLCR7e0DCw5/
https://www.instagram.com/p/BHqQxb_js_3/