Simplify3D
Note: I’ve updated this post to reflect the most recent 3.0 release, in June 2015
I started 3d printing in March of 2012 on my Makerbot Replicator (1). I used ReplicatorG as my slicer, since that was the primary option at the time. When Makerware (now Makerbot Desktop) was released I switched to it, and never looked back. I’ve found success with it, and really only have a few complaints. Namely that it slices very slowly (can take hours in some cases), and while you can make custom profiles (which I use), it’s clunky editing a text file (I shouldn’t really complain about that, considering how much programming work I do). I eventually got Sailfish firmware loaded on my Replicator 1 as well.
Christmas 2014 I decided to gift myself with Simplify3D (S3D below): I’d read a lot of good about it online, and decided to give it a shot. $140 isn’t cheap for a dedicated slicer with no trial version, but bit the bullet anyway (well, after testing it for a few weeks at work first).
In July of 2015 I finished building a new Core-XY bot running Marlin, and now use S3D for its slicing as well.
This blog post will be a continuing repository of my thoughts as I continue to learn and work with it: S3D does a lot of good, and up until the release of 3.0 there were several areas that rubbed me the wrong way. Note I started working with version 2.2.0, which sounded like a pretty major update, and have been pleased with many bug fixes in 3.0. Also know that the bulk of the “Cons” (many of which have been fixed in 3.0) discussed below have already presented directly to the S3D developers.
This will be organized into three main sections:
- Pros : Things I really like about it.
- Cons/Bugs : Things that could be done better.
- Workarounds : Cons that I’ve found solutions for.
- Fixes : These are past cons/bugs that later updates have addressed.
- Conclusions : Overall thoughts
My setups:
- Home:
- Makerbot Replicator 1 with Sailfish Firmware.
- Custom-built Core-XY rig running Repetier firmware & RADDS electronics.
- Simplify3D 3.0.0 on OS X 10.10.1
- Work:
- Makerbot Replicator 2X with Sailfish Firmware.
- Simplify 3D 3.0.0, Windows 7
Pros
There are more things than this I consider “pros”, these are just some of the stand out ones I’ve encountered.
- Really Fast Slicer : I’ve played with Cura and I’ know how fast it is. I’ve not compared S3D’s speeds to it. But compared to Makerware, it’s exponentially faster. Minutes in Makerware are seconds in S3D.
- Good quality output : At minimum, prints just as good as the best stuff I got out of Makerware.
- Great GCode Previewer : Being able to preview every layer of the slice, and to visualize the speed in which it will be printed is invaluable. That coupled with the slicing speed turns this into an actual iterative process: Change a few settings, preview. Change a few settings, preview. Etc.
- Cross Section View : Allows you to visualize any cross section of your model, or GCode. So handy!
- Many Knobs To Twist : Each “Process” is organized into multiple tabs giving you complete control over just about every setting imaginable.
- Tooltips : A little thing, but every setting in a Process has a tool tip telling you about it. Which is really important, considering there’s no official documentation.
- Adjust Settings Per Layer : Great option: You can set each “Process” to a layer range, completely adjusting all the settings as needed.
- Different Settings Per Model : Not only can you split settings based on layer, each individual model can get its own Process with individual settings.
- User Support : Getting feedback/support/help from the developers seems prompt.
- Forums : Active forums.
- Supports many printers: You can take your knowledge with you as you change hardware: When I built my new machine, even though it has completely different firmware than my previous printers, I was able to roll all my exiting S3D knowledge right into it.
- Tethered Printing : If printing tethered, can adjusting settings (speed, extrusion, temp) on the fly while printing, issue live GCode commands + get a live play-by-play in the GCode previewer.
- Great Support Material Creation : Create it automatically or by hand, either way it prints well and removes easily.
- Successfully prints intersecting models : This is a big one: I’ve had issue in the past (Makerware) where two models were brought into the build platform and made to intersect (on purpose) : Makerware didn’t always like this. As a test I brought in 1500 separate obj files, all intersection in different ways, and it sliced perfectly, combining mesh were appropriate so there was no intersecting extrusions.
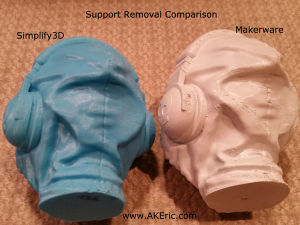
- Fantastic Support Generation:
- Not only does it create create great auto-generated support (except a bug mentioned below), it allows you to place your own. In addition, it allows the support to become more complex as it approaches the surface, to speed support printing and provided better support overall. Plus, it tears free amazingly well: In the below pic, S3d is on the left, Makerware is on the right (painted white), they both took around 25 hours to print (they’re the size of big grapefruits): The makerware supports required pliers to remove, and there is still much cleanup needed. The sS3d support easily removed just using my fingers, and left minimal scarring on the print.
 (click to zoom)

- Great infill options (new in 3.0) : A variety of different infill for both strength and speed.
Cons/Bugs
- No (official) Online Documentation : While there are tooltips for all the settings, there should be a more detailed overview of all the setting online. Their support is really responsive, but I can’t see a downside to providing real documentation.
- The “Center And Arrange” option only moves things, won’t rotate them : The tool could use a better packing algorithm that not only moves stuff around, but can intelligently rotate them as well.
- The Estimated Print Time can be wildly off :
- Makerware is pretty consistent when estimating time: It always over-estimates by about 20% in my experience. S3D however is all over the place: I’ve had a print estimated at 3.5 hours take close to 7. Most of the time though, it appears to underestimate the print times, but it can vary from 50%-10%. Can’t make much rhyme or reason out of it, other than it’s a pretty useless number

- After working with the software, it looks like print times on Makerbot machines (Sailfish firmware) are way off, but on machines with Marlin firmware, it’s pretty accurate. I’m wondering if it has to do with the Makerbot x3g conversion?
- Makerware is pretty consistent when estimating time: It always over-estimates by about 20% in my experience. S3D however is all over the place: I’ve had a print estimated at 3.5 hours take close to 7. Most of the time though, it appears to underestimate the print times, but it can vary from 50%-10%. Can’t make much rhyme or reason out of it, other than it’s a pretty useless number
- No Trial Version : Since this is paid software, make a trial version so more people can try before they buy. Maybe it disables save, but even giving access to the GCode previewer & process settings could sway more people its direction.
- Auto-generated support can completely miss ‘floating features’ : Picture a stalactite hanging from a cave ceiling: S3D won’t auto-place support under it’s tip: It’ll let it hang free in space, completely unsupported, failing the print. It’s up to you to check over you model completely, making sure support has been placed correctly. I have a thread on the forum here illustrating this. I really hoped this would be fixed in 3.0, but it has not
- It does no toolpath simplification for highres mesh: This means high-res small stuff will print poorly, since you get super-small toolpaths that make your machine do a dance. S3D argues you should give it good mesh. I argue that I shouldn’t have to auto-decimate every mesh I throw at it (since auto-decimation can screw up fine features)… makes printing scaled stuff far more of a hassle that it should be. I show this issue visibly via this post, under the “High Res – Low Quality” section.
- Thin wall printing isn’t supported. Say you have a 1.0mm volcano nozzle, and the wall you’re trying to print is .5mm thick : The slicer will just disregard it. This is a hot topic in the forums. If a slicer like Makerware supports it (they call them spurs, or single-thickness walls) S3D should. Otherwise you have to generate new models for new nozzles, what a nighmare.
- Black box: They tend to release a new version once a year, but you don’t know when, nor what features will be in it. I’ve asked them if there was any sort of known list of improvements, and none was provided.
Workarounds
- Holes In The Roof :
- I had a continual problem when printing at 100 micron where there would be holes towards the top of the roofs in my prints. Driving me crazy.
- I finally tracked down the problem: I would create my 100 micron profile by duplicating a 200 micron profile. In the 200 micron file, I’d have 3 roof layers set: That’s a roof .6mm thick. But I wouldn’t adjust it in the new profile (since I’m used Makerware, which allows you to define a fixed roof thickness, rather than number of roof layers). So when it would print its roof, it would print 3 layers at .1mm: A total of .3mm thick. The equivalent of one and a half .2mm layers. Not nearly enough for coverage.
- The lesson learned is: When you change your layer height, you also need to change your roof layers (and floor) to match. I’d print 6-8 roof layers at 100 micron to get adequate coverage.
Fixes:
- Weak Infill : Addressed in v3.0
- Only One Type Of Infill : Addressed in 3.0
- Not Ready For Dual Extrusion Yet : While I haven’t tested this yet, it looks like 3.0 addresses many dual-extrusion issues.
- No Undo : Addressed in 3.0
- When translating mesh, it always snaps to a top view : Addressed in 3.0
- Unable to fully translate\rotate\scale on all axes interactively with the mouse : Addressed in 3.0
- No Option to “Scale to Max Print Size” : Addressed in 3.0
- When in GCode preview mode, you can still accidentally move mesh : Addressed in 3.0
- No Orthographic Cameras : Fixed in 3.0. But it’s sort of hidden in the preferences window, so it’s easy to toggle.
- “Model Settings Window” related : All fixed in 3.0
- When changing values via the spinners, it’s a fixed (large) step amount. These should be user configurable for precise control.
- Can’t change “Object Size Dimensions” : You can change the scale of an object, but you can’t set it’s absolute size. C’mon, Makerware does it…
- Changing the Trans\Rot\Scale values don’t effect anything in the “Calculated Properties” section until you reopen the window: It should be a bi-directional connection allowing either to be edited.
- It’s a modal dialog, meaning you can’t do any interaction with the rest of the software while working with it. Like say, change the camera view, since this dialog is blocking the view of your model…
- I takes up a lot of screen real-estate: On my laptop it obscures a quarter of the screen, making it a dance to move it to some location where it won’t obscure the model I’m trying to transform (see the above issue).
- The transform values aren’t saved between sessions. Meaning, if you translate, rotate and scale an object to specific values, after you save, close, and reopen the scene, the model will be in your transformed position, but those settings will be set back to zero: Makes it hard to later make precise adjustments based on the original size of the model
- Strange behavior when changing the default hotkeys : I’ve not tested this, since the new hotkeys are pretty good, but I’m guessing this is fixed in 3.0
Conclusions
- Is S3D worth the money?
- This is really a personal questions, based on your needs. For myself, especially since the release of 3.0, I’d give it an easy yes.
- If you were going to make a business out of 3d printing, I’d give it a resounding yes: While I’m no expert in all the slicers out there, I’m not aware of any other slicer that provides you with the features S3D has.
- With v2.2, it felt close to greatness, but fell a bit short. With the release of 3.0 though, addressing so many issues, it really feels like a full-featured piece of software now.


