Archive for January, 2011

Arduino to Maya Communication via Python
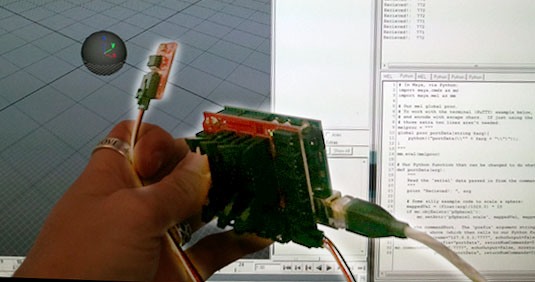
Arduino + light sensor talking to a sphere in Maya

I’ve wanted for some time to get my Arduino to talk with my 3d application of choice, Maya.  There were a few hurdles to overcome first:

  1. The Arduino communicates to the computer over the serial port (easily, by default).
  2. Maya (to my knowledge), has no built-in serial communication.  If you can find a built in mel command or API call, let me know 😉
  3. Maya comes with its own version of the Python scripting language (2.6ish)
  4. Python (external to Maya) has it’s own (separately installed)  pySerial module.  BUT:
    1. pySerial is a 32-bit app  (no 64-bit build I can find, and I’m not smart enough to recompile it to 64-bit).
    2. I’m running a 64-bit version of Maya, with a 64-bit version of Python = I can’t use pySerial in Maya :-(

Maya can however receive incoming communication over a commandPort, which you can ‘pretend’ is a serial port.  Below I’ll describe how to do that.  A bunch of these steps I’d already discussed in previous blog posts here or on my mel wiki, which I’ll list individually first:

Overview of the process:

  1. Author Arduino code to read sensor data and send it over the serial port.
  2. Author Python code in Maya (Maya’s version of 64-bit Python 2.6) to setup a commandPort, and to do ‘something’ with the incoming data.
  3. Author Python code external to Maya (in 32-bit Python 2.6) to receive the Arduino serial data (using pySerial), and broadcast it to the open Maya commandPort.

Notes about the commandPort code below:

  • I’ve hard-coded the commandPort data below to the address of  “127.0.0.1:7777”.
  • 127.0.0.1 is the localHost address of your machine, you shouldn’t change that.  But the “7777” is an arbitrary port number I made up, feel free to change it.
  • The important thing is that it must be consistent in all the places referenced in the code below.

Step 1:  Author Arduino Code:

This is a very simple sketch showing you the bare-bones requirements. In my case, I’ve hooked up an analog sensor to pin 5 (in my case, it’s a light sensor).
Upload this to the Arduino and start broadcasting!  You can open the Arduino Serial Monitor to see what it’s up to, but be sure to close the monitor before you do any other work.

/**
SerialSend01
Eric Pavey 2011-01-26

Sketch will print the value from the sensor to the serial port.
Sensor is plugged into analog pin 5
*/

#define SENSOR 5
int val = 0;

void setup(){
  Serial.begin(9600);
}

void loop(){
  val = analogRead(SENSOR);
  // Print to the serial port:
  Serial.println(val);
  delay(100);
}

Step 2: Author Python code in Maya:

The below code could eventually be made into a well-packaged Maya-Python module, but for the time being you can just paste it into the Script Editor for execution.  Thing to note:

  • The Maya commandPort command has a ‘prefix’ parameter that takes the name of a mel procedure (not Python function) that can intercept the incoming data.  Because of this, we use Python to create a simple wrapper mel procedure that in turn calls to the Python function that does the work.
  • In the below example, I have the Python function query for the existence of a ‘pSphere1’ object in Maya, and if it finds it, will scale it based on the passed in Arduino sensor values.  This should obviously be changed to something way more cool for what you’re doing :-)
# Eric Pavey - 2011-01-26
# In Maya, via Python:
import maya.cmds as mc
import maya.mel as mm

# Our mel global proc.
melproc = """
global proc portData(string $arg){
    python(("portData(\\"" + $arg + "\\")"));
}
"""
mm.eval(melproc)

# Our Python function that can be changed to do whatever we want:
def portData(arg):
    """
    Read the 'serial' data passed in from the commandPort
    """
    print "Recieved!: ", arg

    # Some silly example code to scale a sphere:
    mappedVal = (float(arg)/1023.0) * 10
    if mc.objExists('pSphere1'):
        mc.setAttr('pSphere1.scale', mappedVal, mappedVal, mappedVal)

# Open the commandPort.  The 'prefix' argument string is calling to the defined
# mel script above (which then calls to our Python function of the same name):
mc.commandPort(name="127.0.0.1:7777", echoOutput=False, noreturn=False,
               prefix="portData", returnNumCommands=True)
mc.commandPort(name=":7777", echoOutput=False, noreturn=False,
               prefix="portData", returnNumCommands=True)

Step 3: Author Python module to receive Arduino serial data and broadcast to Maya:

You must make sure you’ve previously downloaded and installed pySerial to a place where your system-installed Python can see it.  And it goes without saying you also need to have Python 2.6 installed as well.

This code will intercept the Arduino serial data, and send it to Maya over the commandPort.  It will only send new data, meaning, it will only send data that has changed from the previous data received.

# arduinoRead.py
# Python module external to Maya
# Eric Pavey - 2011-01-26

import socket
import serial

ARDUINO =  "COM3"

def main():
    maya = socket.socket(socket.AF_INET, socket.SOCK_STREAM)
    maya.connect(("127.0.0.1", 7777))
    ser =  serial.Serial(ARDUINO, timeout=1)
    prevVal = None
    while 1:
        # Read the serial value
        ser.flushInput()
        serialValue = ser.readline().strip()
        # Catch any bad serial data:
        try:
            if serialValue != prevVal:
                # Print the value if it differs from the prevVal:
                maya.send(str(serialValue))
                prevVal = serialValue
        except ValueError:
            pass

if __name__ == '__main__':
    main()

Save the above code as a Python module, and then execute it from a shell:

c:\pythonStuff\python arduinoRead.py

This should form the link between the broadcasting Arduino, and the listening Maya session, converting from serial data to data sent over Maya’s commandPort.

Result:

In Maya, make a sphere, and rename it to ‘pSphere1’ if it’s not already.  If all the code is working, you should see the script editor print the received Arduino data whenever it changes, and you should see the scale of your sphere be effected by that data.  Magic!
Android Adventures, part 8: On a Mac?

Back to part 7.5…

I started using Apple’s back in the early 80’s:  Staying up late at my friends house playing Wizardry (1) on his Apple ][+ in ’81 was a great time.  My family picked up an Apple ][c in the mid 80’s which lasted for many years.  But by the late 80’s we jumped on the PC bandwagon, and it was a steady stream of 286’s, 386’s, 486’s, Pentium’s, etc,… up until today where I’ve had a Dell laptop for the past six years.  It treated me well, but has been showing it’s age.

Time to get a new laptop.  Doing my research, I learned the majority of the tech-friends I respect all vote for Mac.  Mac?

Long story short:  Now have a nice new shiny Macbook Air.  Easily portable, solid state drives, and feels nice in your hand.  Time to get software!

Below is the process I went through getting the Android SDK on the machine, getting ‘Processing for Android’ on it, and all the confusion that went on in-between considering I’m a complete mac noob.  This is actually very similar to “Android Adventures, part 2” where I configured everything on my PC, but with some twists.

A.  Install Software to get ‘Processing for Android’ working:

  • Per the instructions on the ‘Processing for Android’ page, I installed:
  • The Java Development Kit.  Wait, no I didn’t.  The mac comes pre-loaded with that.  Of course I didn’t know that and took me an hour or so to grasp it.  It also comes pre-loaded with Python, Ruby, and many other things.  My PC didn’t come with any of that….
  • Downloaded Android SDK for mac, and installed it.  Since this wasn’t a .dmg, but a zipped dir, I had to do research on where to put it.  Ultimately I renamed the folder it came in and:
    • Stuck it here  /Users/ak_eric/Documents/android-sdk
    • Had to edit my ~/.bash_profile adding these two lines: (there was already an export line for the PATH)
      • PATH=${PATH}:/Users/ak_eric/Documents/android-sdk/tools:/Users/ak_eric/Documents/android-sdk/platform_tools
      • export ANDROID_SDK=/Users/ak_eric/Documents/android-sdk
  • Download ‘Android for Processing’ for the mac.  This is where everything really went wrong:
    • My Android phone is still on os 2.1, which runs the SDK 7 tools.  Reading the download notes, it looked like to me I needed to download ‘Processing for Android’ revision 0191, since that seemed to mesh with SDK 7.  As it turns out, no, I was wrong, I needed to download the latest version.  After that everything started working.  But it took me several days of trial and error to figure this out.  You can see the forum thread on the subject here.

B.  Try out some code:

  • I’d already brought over all my old processing sketches.  During my ‘trial and error’ period mentioned above trying to get Processing for Android working, I downloaded the adbWireless app (which I blogged about previously).  I now use that exclusively to send my Processing for Android apps over to the phone, works great.  No more zany USB configuring for me!

So while it did take me quite a few days to get the whole thing working, it was mainly due to my lack of knowledge of the mac, and failing to install the latest software.  So far the Macbook Air has been a great reintroduction to the world of Apple, I just hope it lasts as long as my Dell 😛

Back to part 7.5…

adbWireless

Just ran across this great tool\app for Android development:  adbWireless.  It allows to you create a wireless (WiFi) adb (Android Debug Bridge) connection between your computer and your Android phone .  I can now present Processing sketches directly to the phone USB-free.  As mentioned\found in the comments below, you need root access for the app to function.  Worked on the first try, had to pass it along.

Android Adventures part 7.5 : More multi-touch in Processing

Back to part 7…, on to Part 8…

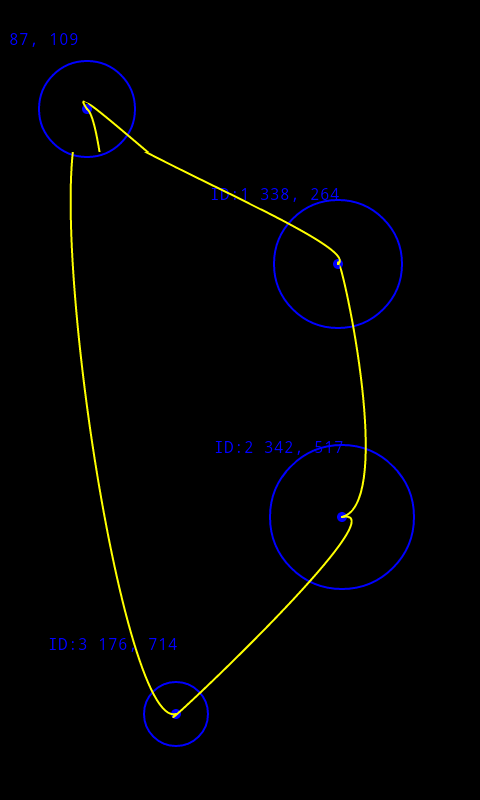
Example sketch made with this code.

Based on my previous post (part 7), I wanted to advance the capabilities of multitouch in Processing a bit more.  The previous example was fairly primitive, but got the job done.  However, it had a few shortcomings:

  • The drawing of graphics was happening in the surfaceTouchEvent() function, rather than Processing draw() function.  This caused a bit of flickering on screen, and made it hard to screengrab stuff from the Davlik Debug Monitor.
  • It only tracked the current position; it stored no historical data.  What if you wanted to track the previous frames position for a certain touch point to generate a motion vector?

With a bit of work I came up with the below code.  It is a snapshot of only the code that is needed to enable more robust multitouch querying in your Processing sketch.  You’d take over in the draw() function. Quick overview:

  • At the top two global variables are defined that store the max number of touch points your phone supports (by trial and error via this code I found that my phone has five), and an array that will store the MultiTouch data.  It should be noted that you can set maxTouchEvents to a higher number just to be safe, shouldn’t hurt anything.
  • setup() populates the MultiTouch array with new MultiTouch objects.  Each object tracks a different touch point.
  • draw() then checks for updated (touched) MultiTouch data, and then exposes those objects to you to query.  The attributes I gave them mirror how Processing deals with querying mouse positional data:  motionX, pmotionX, motionY, pmotionY, size, psize, id.
  • surfaceTouchEvent() is a function that can be overridden to intercept Androids MotionEvent objects, that store the MultiTouch data in them.  That’s what happens below:  It updates our MultiTouch array created earlier with any new MultiTouch data whenever the screen has motion applied to it.
  • MultiTouch is the class that stores the data extracted from the Android MotionEvent object.  One is created per touch point on screen (so if you have five touch points, then you have five of these objects).

Here’s the code:

// multiTouchCore.pde
// Eric Pavey - 2011-01-02
// Code used to get multitouch working in Processing.
// Add to what's in the draw() function to implement the magic.

// It's all about the MotionEvent:
// http://developer.android.com/reference/android/view/MotionEvent.html

//------------------------------
// Setup globals:

// Define max touch events.  My phone (seems to) support 5.
int maxTouchEvents = 5;
// This array will hold all of our queryable MultiTouch data:
MultiTouch[] mt;         

//------------------------------
void setup() {
  // Populate our MultiTouch array that will track all of our touch-points:
  mt = new MultiTouch[maxTouchEvents];
  for(int i=0; i < maxTouchEvents; i++) {
    mt[i] = new MultiTouch();
  }
}

//------------------------------
void draw() {
  // If the screen is touched, start querying for MultiTouch events:
  if (mousePressed == true) {
    // ...for each possible touch event...
    for(int i=0; i < maxTouchEvents; i++) {
      // If that event been touched...
      if(mt[i].touched == true) {
        // DO SOMETHING WITH IT HERE:
        // Amazing mult-touch graphics implemeneted....
      }
    }
  }
}  

//------------------------------
// Override parent class's surfaceTouchEvent() method to enable multi-touch.
// This is what grabs the Android multitouch data, and feeds our MultiTouch
// classes.  Only executes on touch change (movement across screen, or initial
// touch).

public boolean surfaceTouchEvent(MotionEvent me) {
  // Find number of touch points:
  int pointers = me.getPointerCount();
  // Set all MultiTouch data to "not touched":
  for(int i=0; i < maxTouchEvents; i++) {
    mt[i].touched = false;
  }
  //  Update MultiTouch that 'is touched':
  for(int i=0; i < maxTouchEvents; i++) {
    if(i < pointers) {
      mt[i].update(me, i);
    }
    // Update MultiTouch that 'isn't touched':
    else {
      mt[i].update();
    }
  }

  // If you want the variables for motionX/motionY, mouseX/mouseY etc.
  // to work properly, you'll need to call super.surfaceTouchEvent().
  return super.surfaceTouchEvent(me);
}

//------------------------------
// Class to store our multitouch data per touch event.

class MultiTouch {
  // Public attrs that can be queried for each touch point:
  float motionX, motionY;
  float pmotionX, pmotionY;
  float size, psize;
  int id;
  boolean touched = false;

  // Executed when this index has been touched:
  //void update(MotionEvent me, int index, int newId){
  void update(MotionEvent me, int index) {
    // me : The passed in MotionEvent being queried
    // index : the index of the item being queried
    // newId : The id of the pressed item.

    // Tried querying these via' the 'historical' methods,
    // but couldn't get consistent results.
    pmotionX = motionX;
    pmotionY = motionY;
    psize = size; 

    motionX = me.getX(index);
    motionY = me.getY(index);
    size = me.getSize(index);

    id = me.getPointerId(index);
    touched = true;
  }

  // Executed if this index hasn't been touched:
  void update() {
    pmotionX = motionX;
    pmotionY = motionY;
    psize = size;
    touched = false;
  }
}

Back to part 7…, on to Part 8…