Arduino talks to Processing, Python…
Note: This post has been updated, see notes below.
Been enjoying tinkering around with the Arduino and the Electronic Brick Kit I recently got. It’s easy to send data from the computer to the Arduino and run sketches there, but what about the other way? The Arduino can talk back with the computer over its serial port, so at that point any language that can read the serial port can read the Arduino’s data. Since I’m most comfortable with Python and Processing, that’s what the below code covers.
Few things to note:
- Python has no built-in serial modules\packages (to my knowledge), but I found several references to pySerial, that appears to be the go-to source for cross-platform serial info in Python. So you will need that.
- Update: After a bit of thinking, I have got Python working independently from Pygame, see notes below.
- (Old subject): I couldn’t get Python working directly: When I’d run a loop to capture the serial data, it would hang the shell. I figured this was because it wasn’t ‘advancing in time’ (just looping endlessly on the first item), so I popped the code into Pygame, and it started working flawlessly. There probably is a way to do this in Python, but this is my first stab at reading any kind of serial data. So the Python example is implemented via Pygame.
- This is all authored on Win2k OS. Serial ports on different OS’s are handled differently. For the Python and Processing code I define a variable that sets which com port the Arduino is on (in my case, it’s COM5), which is something that you should have already defined via the Arduino IDE. Just make sure those values match. And again, if you’re on Linux of Mac, the serial port values will be different.
- On both the Processing and (the old) Python examples, they will draw a window with a circle inside that will change in size based on the passed in serial data. Based on the sensor I was using (twist sensor) on an analog pin, this maps the voltage of the sensor into values 0-1023, which are easy to then map into the on-screen graphics. The code will also print out to the shell\IDE the captured serial values.
- Finally, I should point out I pulled a lot of info from the book Getting Started with Arduino.
Dependencies:
- Arduino:
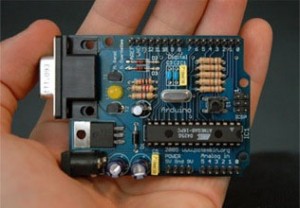
- Buy an Arduino (I used a Duemilanove)
- Software Download (tested on 0017)
- Python:
- Python Download (tested on 2.6.2)
- Pygame Download (tested on 1.9.1)
- pySerial Download (tested on 2.5)
- Processing:
- Processing Download (tested on 1.0.9)
Begin:
Arduino:
Here is the Arduino code. I have a rotational sensor on analog pin 5. But you can use any kind of sensor that you want. I picked the rotational sensor since it’s easy to see the values change.
/**
serialSensor
Eric Pavey 2009-12-26

Sketch will print the value from the sensor to the serial port
*/

#define SENSOR 5

int val = 0;

void setup(){
  Serial.begin(9600);
}

void loop(){
  val = analogRead(SENSOR);
  // Print to the serial port:
  Serial.println(val);
  delay(100);
}
When that is uploaded to the Arduino you can hit the ‘Serial Monitor’ button in the IDE, which will pop up a new window that shows the values captured from the serial port: When I twist my rotational sensor, I see the result print in the serial monitor. Pretty straight-forward. Be sure to close the serial monitor window before you run any of the below code, or they will be blocked from accessing the serial port.
Processing:
The IDE’s for Processing and Arduino are very similar; the Arduino docs say it was ‘built on’ Processing, and the resembelence is strong. When executed, will create a window, with a white circle inside thats size is controlled by the sensor data passed through the serial port.
Here is the Processing code:
/**
 * readArduinoSerial
 * Eric Pavey 2009-12-26
 * Read data from the computers serial port, that is being fed
 * by an Arduino sketch.  It's expecting values from 0->1023.
 */

import processing.serial.*;

// Create object from Serial class
Serial myPort;

// Converted data received from the serial port
float val = 1.0;
float prevVal = 1.0;
int minSerial = 0;
int maxSerial = 1023;
// Define which port the Arduino is on:
String arduino = "COM5";

void setup(){
  smooth();
  frameRate(30);
  size(200, 200);
  myPort = new Serial(this, arduino, 9600);
}

void draw(){
  if ( myPort.available() > 0){
    String portVal = myPort.readString();
    // Trim off any extra chars that have no meaning
    // to our sketch.  If we don't do this, we can get
    // NaN float vals when converted.
    String trimmed = portVal.trim();
    if(trimmed.length() > 0){
      // if we have a valid value, update it:
      val = float(portVal);
    }
  }
  if(val != prevVal){
    println("New val: " + val);
    prevVal = val;
  }

  background(0);
  float mapVal = map(val, minSerial, maxSerial, 1, width);
  fill(255);
  ellipse(width/2, height/2, mapVal, mapVal);
}
Python / Pygame:
Like Processing, when executed, will create a window, with a white circle inside thats size is controlled by the sensor data passed through the serial port.
Here is the Python / Pygame code:
"""
readArduinoSerial.py
Eric Pavey - 2009-12-27

Read data from the computers serial port, that is being fed
by an Arduino sketch.  It's expecting values from 0->1023.
"""

import serial
import pygame
from pygame.locals import *
pygame.init()

WIDTH = 256
HEIGHT = 256
FRAMERATE = 30
# Define which com port the Arduino is on:
ARDUINO = "COM5"

screen = pygame.display.set_mode((WIDTH, HEIGHT))
pygame.display.set_caption("Arduino Serial Com.")
clock = pygame.time.Clock()

ser = serial.Serial(ARDUINO, timeout=1)
floatVal = 1.0
prevVal = 1.0

def main():
    global floatVal
    global prevVal
    cirCol = Color("white")
    looping = True

    while looping:
        clock.tick(FRAMERATE)
        screen.fill(0)

        for event in pygame.event.get():
            if event.type == pygame.QUIT:
                looping = False

        # Read the serial value
        ser.flushInput()
        serialValue = ser.readline().strip()

        # Catch any bad serial data:
        try:
            floatVal = float(serialValue)/8.0
            if floatVal != prevVal:
                # Print the value if it differs from the prevVal:
                print "New Val: ", floatVal
                prevVal = floatVal
        except ValueError:
            pass
        pygame.draw.circle(screen, cirCol, (WIDTH/2, HEIGHT/2), floatVal)

        # update our display:
        pygame.display.update()

if __name__ == "__main__":
    main()
Update: Here is the new Python code sans-Pygame. It will print results directly to the shell it was executed from:
import serial

ARDUINO =  "COM4"

def main():
    ser =  serial.Serial(ARDUINO, timeout=1)
    prevVal = None
    while 1:
        # Read the serial value
        ser.flushInput()
        serialValue = ser.readline().strip()
        # Catch any bad serial data:
        try:
            if serialValue != prevVal:
                # Print the value if it differs from the prevVal:
                print "New Val: ", serialValue
                prevVal = serialValue
        except ValueError:
            pass

if __name__ == '__main__':
    main()
In Conclusion…
So while the implementation in Processing \Python is pretty simple, it opens doors into what could be. Another interesting observation is that the Processing sketch was really ‘jumpy’: It seems to capture values that aren’t being reported by the Arduino sketch, causing the circle to ‘jump’ in size occasionally. However, the Pygame (and updated pure Python) app seems pretty rock solid, and no ‘jumping’ is reported.


